Table of Contents
Welcome/Apps/VividTracker/Getting started
Getting started
Overview
VividTracker aims to be compatible with Protracker v2.3D and therefore has about the same features. In Protracker, a song can have up to 64 different patterns, which are played in a specific order. The length of the song can be up to 128 patterns. Each pattern has 64 rows (or steps), with position 00 to 63, and 4 different tracks (VividTracker supports up to 8 tracks), where each track can play one 8-bit sample at a time together with some effects. A track is arranged in different columns.
You can change rows by sliding the finger up and down over the pattern screen, and change to a different column in the same track or change tracks by sliding the finger left or right. Tapping on the Track #1 to Track #4 labels will mute the tracks. Tap again to unmute.
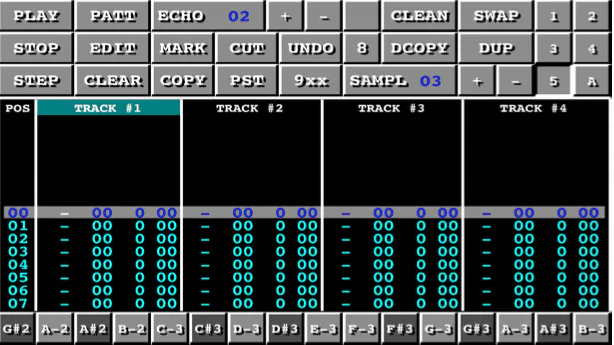
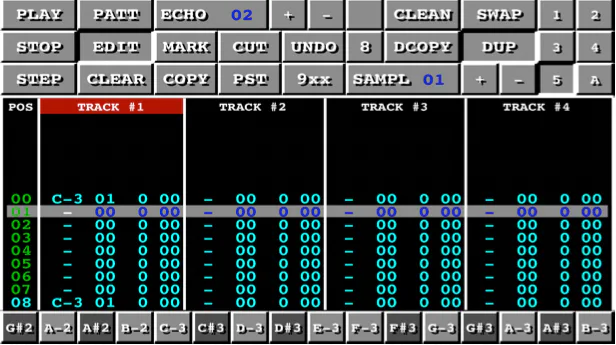
The first column in a track corresponds to the note, which can be from C-1 to B#3. The second column corresponds to the sample (or instrument) and consists of two numbers. The third column is the effect command and the fourth column is the effect value. In the example above, you can see on TRACK #1 the following first row (position 00):
00|C-3 01 0 00
This means note C-3 will be played using sample 01. The final two columns have the values 0 00, meaning no effect is applied. The third row, with position number 02, will again play note C-3:
02|C-3 01 C 20
Here, we can see that the third column has the effect command C followed by the effect value 20. This effect command means volume and the effect value is given as a hexadecimal number from 0 to 40 (40 is max volume). This means we override the default volume of this sample and explicitly tell to play the same note at a lower volume, giving a simple echo effect. You can set the default volume of each sample. No effect will be played if you set the effect to 0 00. See the Effects chapter for further information about the different effects.
The row with position 04 is highlighted and the note E-3 is highlighted with a white text. This is our cursor and you can move around the tracker view by sliding your finger up and down to change row or left and right to change column. The cursor will turn the selected column and row from cyan to white. You can also quickly move to some predefined rows by double tapping on the screen. If you double tap within TRACK #1, you will jump to row 00. If you double tap on TRACK #2, you will jump to row 16. Double tapping in TRACK #3 jumps to row 32 and double tapping in TRACK #4 jumps to row 48. You can use this feature to quickly jump around in the tracker view. Don’t double tap on the TRACK # label. Tapping on the label will mute the track.
At the bottom of the screen, you have a small keyboard with notes (if you have selected the first column in a track) or characters from 0 to F (if you have selected the other columns). You can use this keyboard to enter new values in the tracker view. You can also use it to play different samples. To enter new notes, you have to first press the EDIT button.
The user interface is divided into different screens (1 to 5) and each screen is in turn divided into subscreens (A, B, etc). You can reach the different screens and subscreens using the buttons on the right top side. Throughout this guide book, we will refer the different screens to e.g. Screen 4B or Screen 2A.
Making our first song
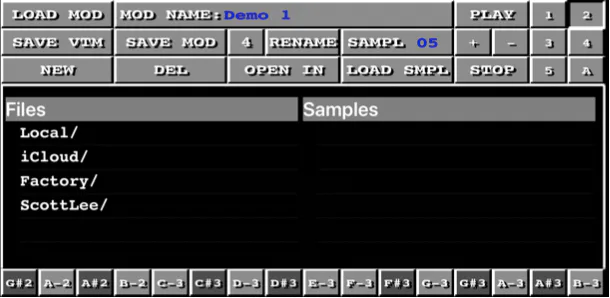
Let’s go to Screen 2A to create our first song. Press the button NEW to start with an empty module. We will go over each screen in detail later. For now, we will only load a few samples to get started. We want to lay down a drum pattern so we want to load three different samples; a bass drum, a snare drum, and a closed hi-hat. Samples in VividTracker are loaded directly from mod-files, so these mod-files serves both as a song file and as sample banks. However, you can also load wav-files as samples separately.
You can see four different folders in the Files table. These are Local, iCloud, Factory, and ScottLee. The Local folder holds all your local files and you can also reach them from Apple’s Files app. The iCloud folder is only visible if you have iCloud turned on (highly recommended!). This is where you can store your songs in VividTracker’s iCloud folder and share between devices. ScottLee is the folder containing six amazing mods from Scott Lee, written between 1987-1990. For now, we are interested in the Factory folder that contains three demo-files and two sample banks (SampleBankDrums.mod and SampleBankInstr.mod). Tap on “Factory” to list the files in that folder. When you later want to go back to the previous folder, tap “..”.
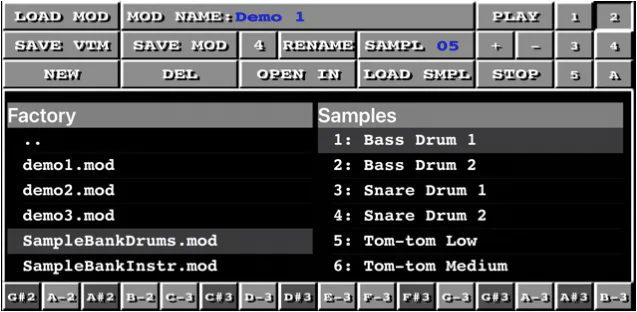
Let’s stay in the Factory folder and select the SampleBankDrums.mod file. When you do this, you will immediately see the samples of this file in the right table. Select the sample you want to load, in this example 1: Bass Drum 1. You can change which sample slot to load into by pressing the + and - buttons next to SAMPL 01. For now, we are happy with loading into sample 1, so you can continue with loading the sample by pressing LOAD SMPL. Now, increase the sample slot by pressing the + button and select the next sample to load. Continue like this so that you have loaded Bass Drum 1, Snare Drum 1, and Hi-Hat Closed to the first three sample slots.
You can of course test your samples by playing them on the keyboard at the bottom of the screen. Default sample for percussion samples is C-3. This way, you can test if you have loaded the right sample and try different samples quickly. Now that we have loaded all the samples for our drum pattern, we can go to Screen 5A to use a very nice feature to enter a drum pattern quickly.
On this screen, we can access the duplicate function using either the button DCOPY or the button DUP. Next to DCOPY, you can see a button with the number 8. If you press this button, it swap between the values 4, 8, 16, and 32. Press it a few times to get it back to the value 8.
When you press the DCOPY button, VividTracker will copy the first N rows (where N=the current number on the number button, e.g. N=8) to the next rows in the currently active track until it fills the whole pattern (i.e. row 00 to 07 will be copied to 08 to 15, 16 to 23, 24 to 31, etc).
This means you only need to enter notes or drums for the first rows if you want the same pattern to repeat again throughout the pattern. Notice that any notes that you have entered on any row beyond row 07 will be deleted and replaced.
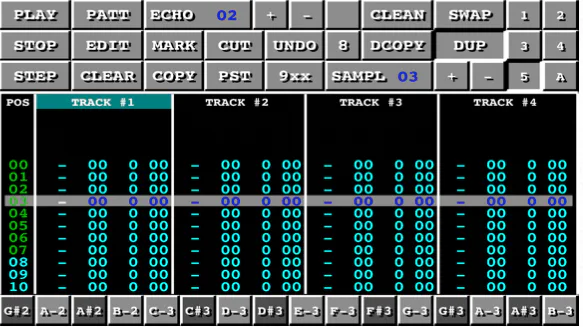
The DUP button is similar to DCOPY. When you select it, you will notice that the first eight rows are now marked in green.
Anything you enter to the first eight rows will get duplicated to the rest of the rows. However, nothing will be erased when you press the DUP button and you will only erase notes at the positions you are currently editing (e.g. if you set a C-3 on row 00, you will do the same thing to row 08, 16, 24, 32, etc, but you will not change any other notes). Also, if you edit outside of the green area, your data will not get duplicated.
Select sample 01 using the +/- buttons and go to the first row and the first column on TRACK #1 (you can quickly jump to row 00 by double tapping on the TRACK #1 view). Press the EDIT button and enter C-3. You will notice that TRACK #1 is now highlighted in red to let you know you are in edit mode.
If you have selected DUP, you will now see that not only did you enter C-3 on row 00 but also on row 08, 16, 24, 32, etc. Let’s continue with sample 3 for row 01 to 03, then sample 2 for row 04, and finally sample 3 again for row 05 to 07. Once you are done, you can depress both the EDIT and the DUP buttons. It should look like this when you are done:
It is time to test this pattern. If you press PLAY, you will play the whole song from row 00 of the current pattern and if you play PATT you will play only the current pattern and you will play from the currently selected row. Since we haven’t added any other patterns into a song, you can press PLAY to play this pattern in repeat.
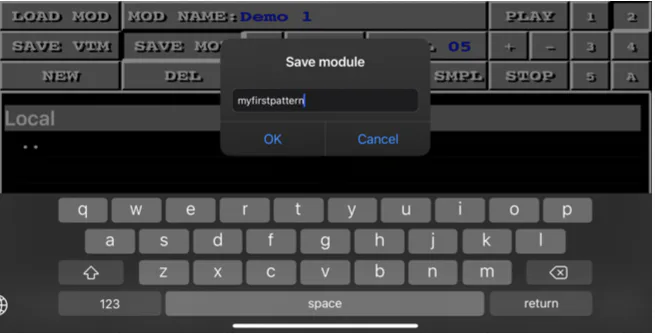
It is good practice to once in a while save our new song as a mod-file. Let’s go to Screen 2A to do this. On Screen 2A, you can either press SAVE VTM or SAVE MOD. SAVE VTM is the internal format of VividTracker, used mainly for the autochord feature that we will get into later. MOD is the original Protracker compatible format. Let’s save it as MOD. First, go to the folder where you want to save your file (either iCloud or Local). Then press the SAVE MOD button. You will be asked to give it a filename. It should just say “.mod” for now. You can erase that and replace it with your name. It doesn’t require the .mod postfix when you enter the filename, so let’s enter the name “myfirstpattern” and press OK.
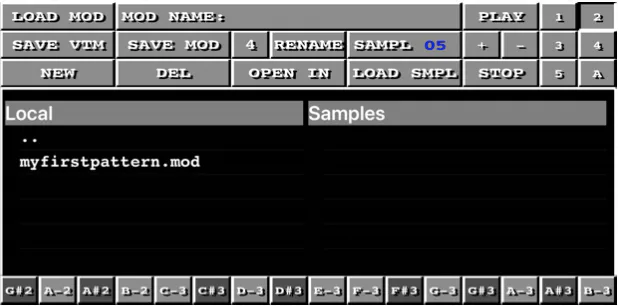
Now that you have saved your first mod-file, you will see it in your Files table. If you select it, you will also see the samples you had loaded into it. Your mod-file is now both a song and a sample bank that you can store for later use.
If you want to continue with loading instrument samples, you can use the keyboard to enter different notes. You can move to the other tracks by sliding your finger horizontally on the screen and you can change rows by sliding your finger vertically.


