This is an old revision of the document!
Getting started
VividTracker aims to be compatible with Protracker v2.3D and therefore has about the same features. In Protracker, a song can have up to 64 different patterns, which are played in a specific order. The length of the song can be up to 128 patterns. Each pattern has 64 rows (or steps), with position 00 to 63, and 4 different tracks (VividTracker supports up to 8 tracks), where each track can play one 8-bit sample at a time together with some effects.
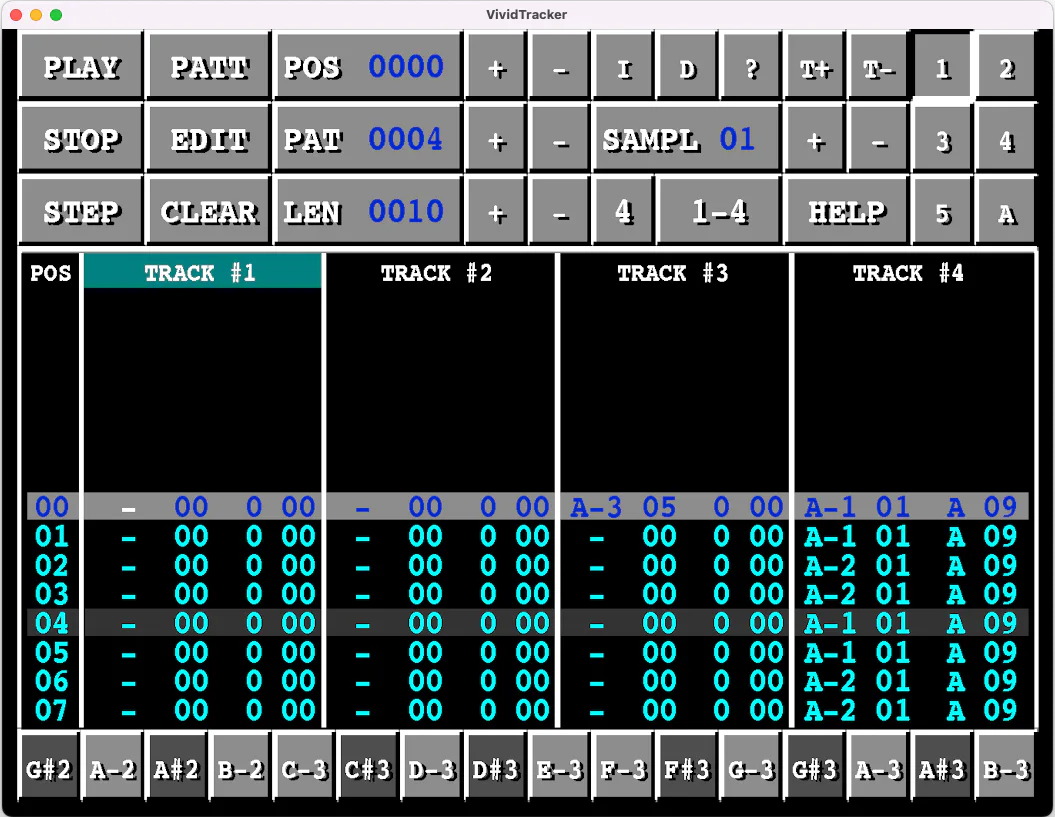
A track is arranged in different columns. The first column corresponds to the note, which can be from C-1 to B#3. The second column corresponds to the sample (or instrument) and consists of two numbers. The third column is the effect command and the fourth column is the effect value. In the example above, you can see on TRACK #1 the following first row (position 00):
00|C-301 000
This means note C-3 will be played using sample 01. The final two columns have the values 0 00, meaning no effect is applied. The third row, with position number 02, will again play note C-3:
02|C-301 C20
Here, we can see that the third column has the effect command C followed by the effect value 20. This effect command means volume and the effect value is given as a hexadecimal number from 0 to 40 (40 is max volume). This means we override the default volume of this sample and explicitly tell to play the same note at a lower volume, giving a simple echo effect. You can set the default volume of each sample. No effect will be played if you set the effect to 0 00. See the Effects chapter for further information about the different effects.
The row with position 04 is highlighted and the note E-3 is highlighted with a white text. This is our cursor and you can move around the tracker view by sliding your finger up and down to change row or left and right to change column. The cursor will turn the selected column and row from cyan to white. You can also quickly move to some predefined rows by double tapping on the screen. If you double tap within TRACK #1, you will jump to row 00. If you double tap on TRACK #2, you will jump to row 16. Double tapping in TRACK #3 jumps to row 32 and double tapping in TRACK #4 jumps to row 48. You can use this feature to quickly jump around in the tracker view. Don’t double tap on the TRACK # label. Tapping on the label will mute the track.
At the bottom of the screen, you have a small keyboard with notes (if you have selected the first column in a track) or characters from 0 to F (if you have selected the other columns). You can use this keyboard to enter new values in the tracker view. You can also use it to play different samples. To enter new notes, you have to first press the EDIT button.
The user interface is divided into different screens (1 to 5) and each screen is in turn divided into subscreens (A, B, etc). You can reach the different screens and subscreens using the buttons on the right top side. Throughout this guide book, we will refer the different screens to e.g. Screen 4B or Screen 2A.

