Table of Contents
Welcome/Apps/VividTracker/VividTracker reference manual
VividTracker Reference Manual
Protracker Effects Reference
VividTracker aims to be 100% compatible with Protracker. Here all all the effects supported:
0 - Normal play or Arpeggio             0xy : x-first halfnote add, y-second
1 - Slide Up                            1xx : upspeed
2 - Slide Down                          2xx : downspeed
3 - Tone Portamento                     3xx : up/down speed
4 - Vibrato                             4xy : x-speed,   y-depth
5 - Tone Portamento + Volume Slide      5xy : x-upspeed, y-downspeed
6 - Vibrato + Volume Slide              6xy : x-upspeed, y-downspeed
7 - Tremolo                             7xy : x-speed,   y-depth
9 - Set SampleOffset                    9xx : sample offset (e.g. 19 -> 1900)
A - VolumeSlide                         Axy : x-upspeed, y-downspeed
B - Position Jump                       Bxx : songposition
C - Set Volume                          Cxx : volume, 00-40
D - Pattern Break                       Dxx : break position in next patt
F - Set Speed                           Fxx : speed (00-1F) / tempo (20-FF)

E9- Retrig Note                         E9x : retrig from note + x vblanks

Other Exx commands:

E1x/2x=FineSlide Up/Down - E30/1=tonep ctrl off/on
E40/1/2=Vib Waveform sine/rampdown/square, E70/1/2=Tremolo Waveform
E5x=Set loop point,E6x=jump to loop+play x times
EAx/EBx=Fine volslide up/down
ECx/EDx=notecut after x vblanks/notedelay by x vblanks
EEx/EFx=PatternDelay by x notes/Invert loop, x=speed
Overview
This reference manual assumes you already are acquainted with Protracker on the Amiga, and will therefore only go through the differences and the extra features that come with VividTracker. It will not teach you about how to make tracker music and about the mod format. Neither will it go through the different effect commands that you find in Protracker. But fear not! Protracker is perhaps the most common music tracker for the Amiga and there are a lot of tutorials on the Internet in how to make tracker music.
First a few notes about background audio and MIDI support. If you want to use another app as a virtual MIDI source, you have to turn on background audio (button B-AUDIO on screen 6). Background audio is normally automatically turned off if you are not playing anything and you leave the app. This means VividTracker will freeze and not run in the background to save power. The exception to this rule is if you have connected VividTracker to Audiobus or another app via IAA. By turning on background audio, you make sure that VividTracker continues to run in the background and can receive MIDI note commands.
VividTracker supports both physical and virtual MIDI instruments. MIDI support in VividTracker is very simple. You can connect a physical MIDI keyboard and use it to enter notes, but that is about it. You cannot control VividTracker by any other means from your MIDI keybard, and it does not adhere to tempo commands. This might change in the future, but that is how it is implemented today.
VividTracker also supports MIDI output. The first 16 samples are sending MIDI output to their own MIDI channel. Sample 1 is sending to channel 1, sample 2 is sending to channel 2, etc. A note off command is sent when a new note is sent, or when the volume is set to 0.
VividTracker does not have a separate sample library. Instead, each module serves as a sample bank with up to 31 samples and you can easily load samples from other modules by using the file browser. VividTracker comes with three demo modules and two sample banks (one bank with drums and one bank with instruments). You can delete them if you like to. These files are always put last in the file browser, unless you edit and save them. Your modules are always listed first. To get more samples, use the AudioPaste feature to copy samples from other apps, or import samples from other modules. Perhaps you already have a bunch of old Amiga modules that you can reuse? Otherwise, you can easily download modules from the Internet. The first demo song, demo1.mod, will be loaded the first time you start VividTracker.
VividTracker is divided into six different screens, and as a Protracker user you will immediately feel at home with the user interface. At the bottom of each screen, you will find a keyboard with different notes. Depending on where you are in the pattern, these buttons will either represent a note or a hexadecimal number between 0 and F. Screens 1, 2, 5, and 6 are all showing the current pattern. Navigating in this pattern is easy. Just swipe your finger up and down to change row, and swipe it left and right to move the cursor that selects the data on the current row. If you want to get quickly back to row 0, simply double tap on the pattern view. Tracks can be muted by tapping on each track header.
VividTracker has a great Auto Chord feature, that allows you to auto transpose a pattern from e.g. C-major to A-minor. VividTracker is making use of effect 8 for the Auto Chord feature. This effect is not used in Protracker. If you use this command and store your module in Protracker MOD format, VividTracker will convert the actual note data so that it is compatible with Protracker. If you want to retain the effect 8 command, you need to store the file in VTM-format (VividTracker Module). VTM is very similar to Protracker but is not 100% compatible, so you will not be able to load VTM files into Protracker. If you are not going to use the Auto Chord feature, you should probably just save your modules in MOD-format. More about the Auto Chord feature later.
Let's go through the different screens:
Screen 1A
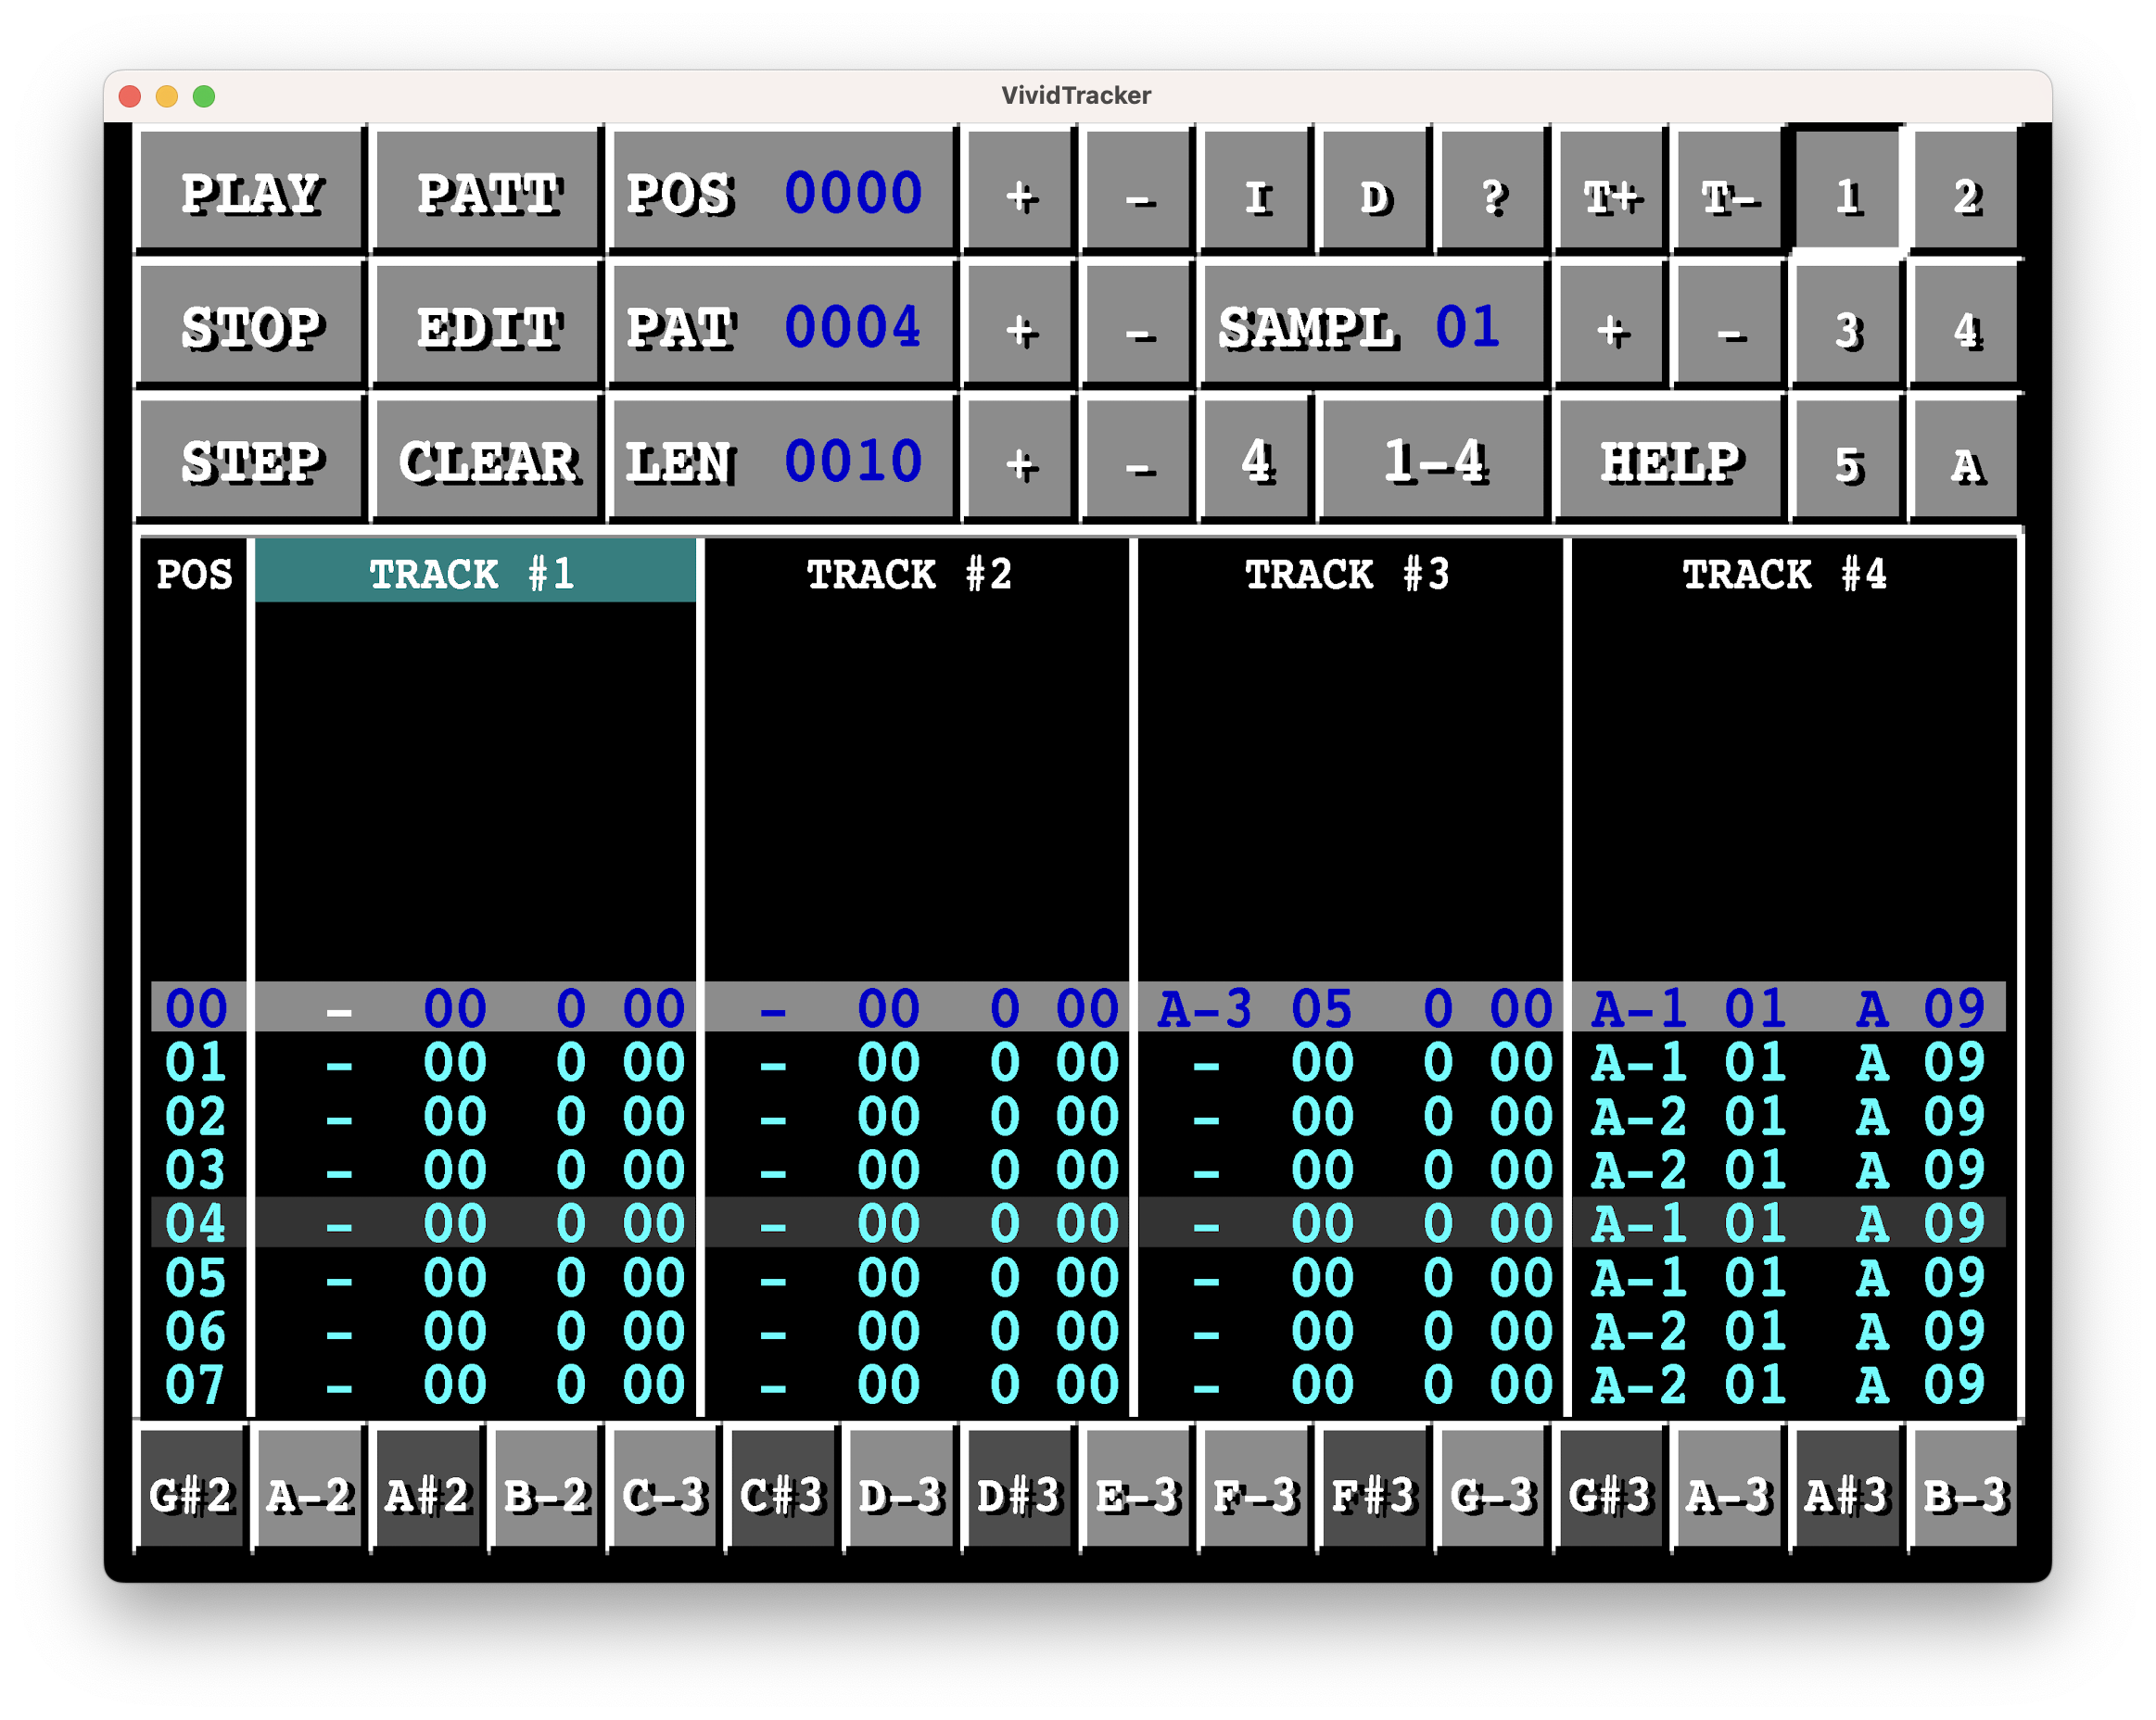
Just like in Protracker, you have buttons like PLAY, STOP, PATTERN (PATT in VividTracker), etc. There are some differences in their functionality. PLAY works exactly like in Protracker, i.e. it starts from row 0 in the current pattern. PATT is a little bit different. It starts from the row where you are in VividTracker (in Protracker it starts from row 0). The reason is that VividTracker does not have room for a CONTINUE button. If you want to play a pattern from row 0, you can do this by first pressing PLAY and then PATT. VividTracker lacks a RECORD button, but you can use PLAY+EDIT to get the same functionality.
POS, PAT, LEN, I, D, work in the same way as in Protracker. A song is a sequence of patterns. LEN will tell you how many patterns that will be played in a sequence. POS will tell the current position in the song (starting from 0 and up). For instance, if your length of the song is 21, the positions will go from 0 to 20. PAT will tell which pattern that is played at the current position. You can extend the song by pressing the + button next to LEN, or decrease it with -. If you want to insert a new pattern in the middle of the song, you can do so by pressing I. The song will then be extended with one pattern. If you want to delete a pattern, you can press D instead.
POS also works as a button. If you press it, you will get into a song view mode, where you can see the structure of the whole song. The POS column in the tracker view is now showing the position in the song and each row is showing what pattern that is played at that position. For each track, you will see a grey or a blue box, telling if the track in the given pattern is empty or not. Tracks 5-8 will be in dark red if you are currently in 4-tracks mode. You can move up and down either by sliding horisontally on the screen with your finger or mouse, or use the +/- buttons next to POS. Use the I, D, or +/- buttons next to POS, PAT, LEN to change the structure of the song as described above.
In Protracker, you can step through the pattern one row at a time by pressing the ENTER button and get audio feedback. You can do the same in VividTracker, by pressing the STEP button. It actually works a little bit better than Protracker, because it adheres to effects like the arp command. One button that is totally different in VividTracker is the CLEAR button. This button simply clears a whole row in the track where you are standing, given that you are in EDIT mode. Protracker also has a CLEAR button, but that button is used to remove either sample data or pattern data from the module.
The T+ and T- buttons are unique in VividTracker. They let you transpose the notes in the bottom keyboard up and down. If you want to step more than one note at a time, you can do that by holding the transpose button down.
SAMPL works almost like in Protracker. It let's you select the current sample from 01 to 31.
? gives you this text but directly within VividTracker without the images. It is nice to have for a quick reference.
HELP opens the VividTracker homepage in Safari.
STEPS finally is a feature that allows you to select the number of steps you want to take when you enter a note or some other data in the pattern. The default value is 1, i.e. as soon as you enter a note you will step to the next row. If you like to enter a drum beat with a kick drum at every fourth row, you can do that easily by setting the steps value to 4. You will then jump four rows at a time when you enter your notes. Note that this feature is not controlling the STEP button. The STEP button is always jumping one row at a time.
Screen 1B
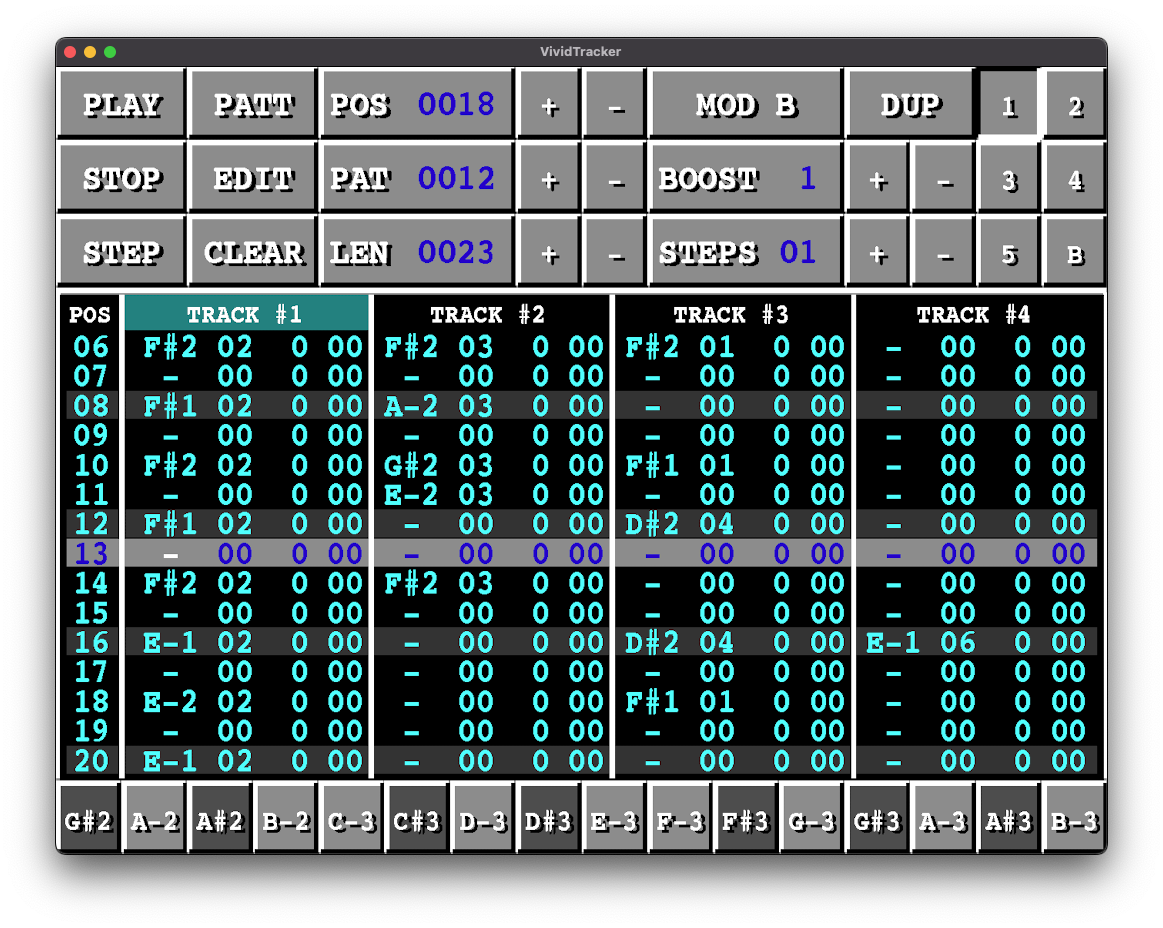
This screen replaces the STEPS function from SCREEN 1A with a BOOST function. BOOST allows you to boost the volume. This is great for modules with low amplitude, but modules with already high amplitude will get through the roof and you get distortion. BOOST=1 equals no boost. On this screen, you can also set if the tracker should be in 4-tracks or 8-tracks mode by pressing the “4” button. The button will change to “8” in order to indicate that you are now in 8-tracks mode. By pressing the “5-8” button, you can change the tracker view to display tracks 5 to 8. Press “1-4” to get back to tracks 1-4.
A new button called DUPI allows you to easy duplicate and insert a new pattern. Go to a position in your song. Press DUPI and it will insert a new position, move to the new position, and make a copy of the pattern in the previous position. For instance, say that you stand in song position 3, pattern 4. Press DUPI and it will move to position 4 where it will insert a new pattern which will be a copy of pattern 4.
VividTracker allows you to load two modules at the same time, as “Mod A” and “Mod B”. This is a great feature where you can easily swap between two modules. Say for instance that you are making a new song but you want to take inspiration from another module. You can then load the other module as module B. The button “MOD A” tells you that you are currently working on module A. Press it to swap to module B. The button will now read “MOD B”. The module will be empty if you have not yet loaded anything to module B. Press the button again to swap back to module A. The same button is also present in Screen 2A & 2B, and Screen 4A.
Screen 2A
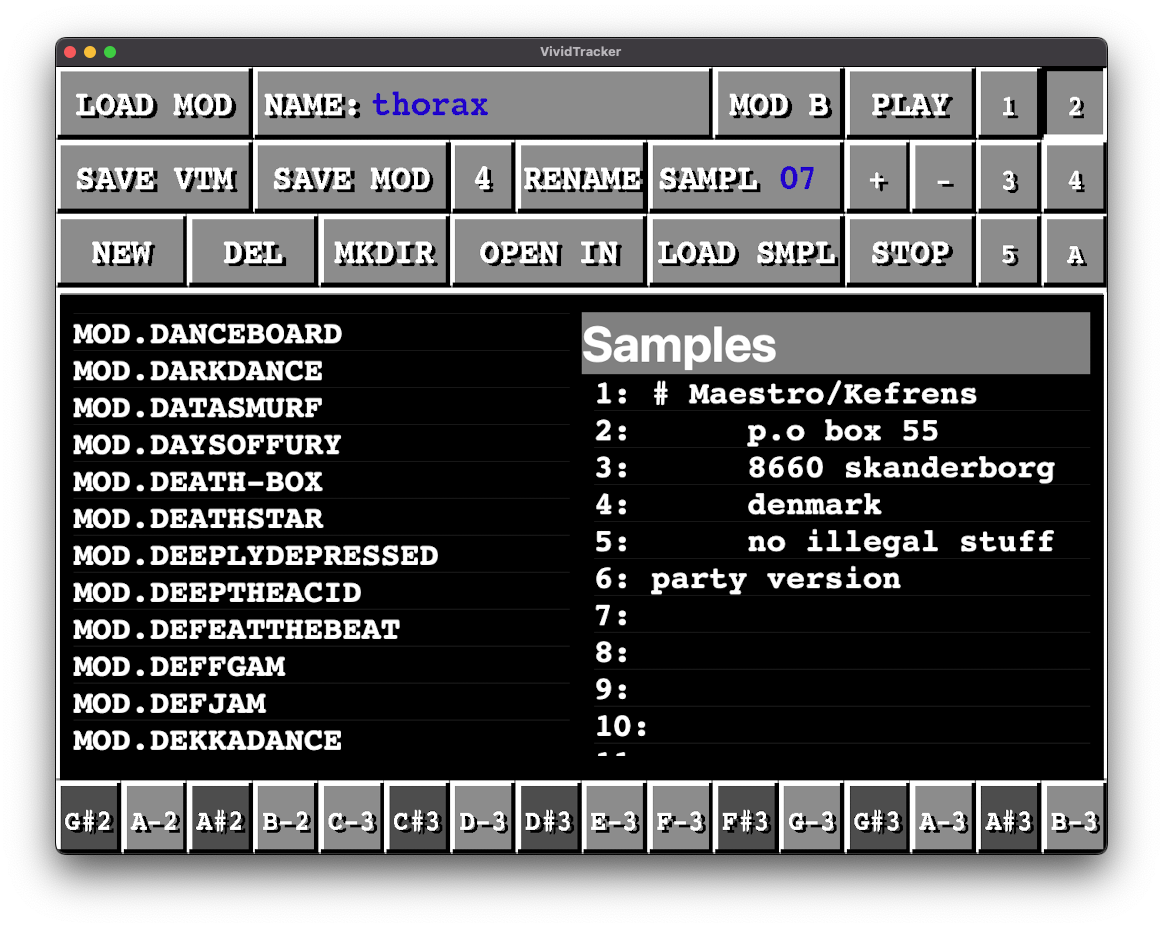
This is the file browser screen. You will see two lists in the middle of the screen: Modules and Samples. There are four folders that you can go into:
- “Local” is your local files on your iPad, not stored on the cloud.
- “iCloud” is your iCloud folder (only visible if you have iCloud turned on).
- “Factory” is a folder with three demo songs and two sample libraries.
- “ST-01” is a folder with all the old classic ST-01 Amiga samples. Load these by selecting a sample, then press “LOAD SMPL”.
- “ScottLee” is a folder with six songs from Scott Lee, who wrote these in the end of the 1980s.
Select any of these folders and you get to the file list of that folder. If you select a module in the Modules list, you will immediately see the samples in that module. The module you selected (either MOD or VTM) can then be loaded by hitting the LOAD MOD button. Once you have loaded the module, you will see the module name listed in the “Mod name:” button. You can change the name of the module by pressing on the actual name (the whole name field works as a button). To step back from the folder, select the “..” item.
Samples can both be loaded as old Amiga-sample files (like the files in the ST-01 folder) or as wav-files. Select the file and then press “LOAD SMPL”. The wav-file will be converted to 8-bit format. The sample rate will depend on what note you have selected on SCREEN 4A. If it says C-3 (default value), then the sample rate will be 16574 samples/sec.
Wav-files can also be opened from other apps. In e.g. AUM, you can select your audio file and ask it to open the file in VividTracker.
Another way of loading samples is directly from another module. When you have selected a module and you see the samples in the Samples list, you can select any of the samples and then press the LOAD SAMPLE button to load it into memory. It will then replace the current sample you have selected (SAMPL on screen 1, 4 or 5). The module you want to take a sample from does not need to be loaded, and this is therefore a nice way of loading samples from other modules.
SAVE MOD allows you to save your current module as a Protracker module. This will give you a module that can be played in Protracker on the Amiga. VividTracker will convert any Auto Chord commands (effect 8) to real note data. This means, even if you have used Auto Chord, you can always save your module as a Protracker module and be able to play it back on the Amiga.
SAVE VTM will save your module in VTM format (VividTracker Module). If you choose to save your module as a VTM file, you will only be able to load it in VivivTracker. The effect 8 command, that controls Auto Chord, will then be retained. If you want to save your module in VTM format, you should press the SAVE VTM button instead of SAVE MOD. Also, any ALLIHOOPA sample ids that you have in your module are stored in the VTM format.
NEW MOD is erasing your current module from memory and gives you a new module.
DEL will delete either a file or a directory. It can be used in two ways:
  a) Select the file you want to delete, then press DEL button
  b) First press DEL button (which will remain pressed), then select the
     file or directory you want to delete
Deleting directories can only be done with the b) option. If you regret pressing the DEL button, you can release it by pressing on it again.
RENAME works in the same way as DEL, but will rename the file rather than delete it.
MKDIR will create a new directory in the current folder in your left file browser.
OPEN IN… let's you open the selected mod file in other apps that can read mod-files (such as Modizer).
4 (or 8) is a button telling if the currently loaded pattern has 4 or 8 tracks. It will either read “4” or “8” depending on how many tracks the mod file has. Pressing it will change the number of patterns from 4 to 8 or 8 to 4. This is the same button that you have on Screen 1B.
MOD A (or MOD B) allows you to easily swap between two modules A and B. See Screen 1B for further information.
Screen 2B
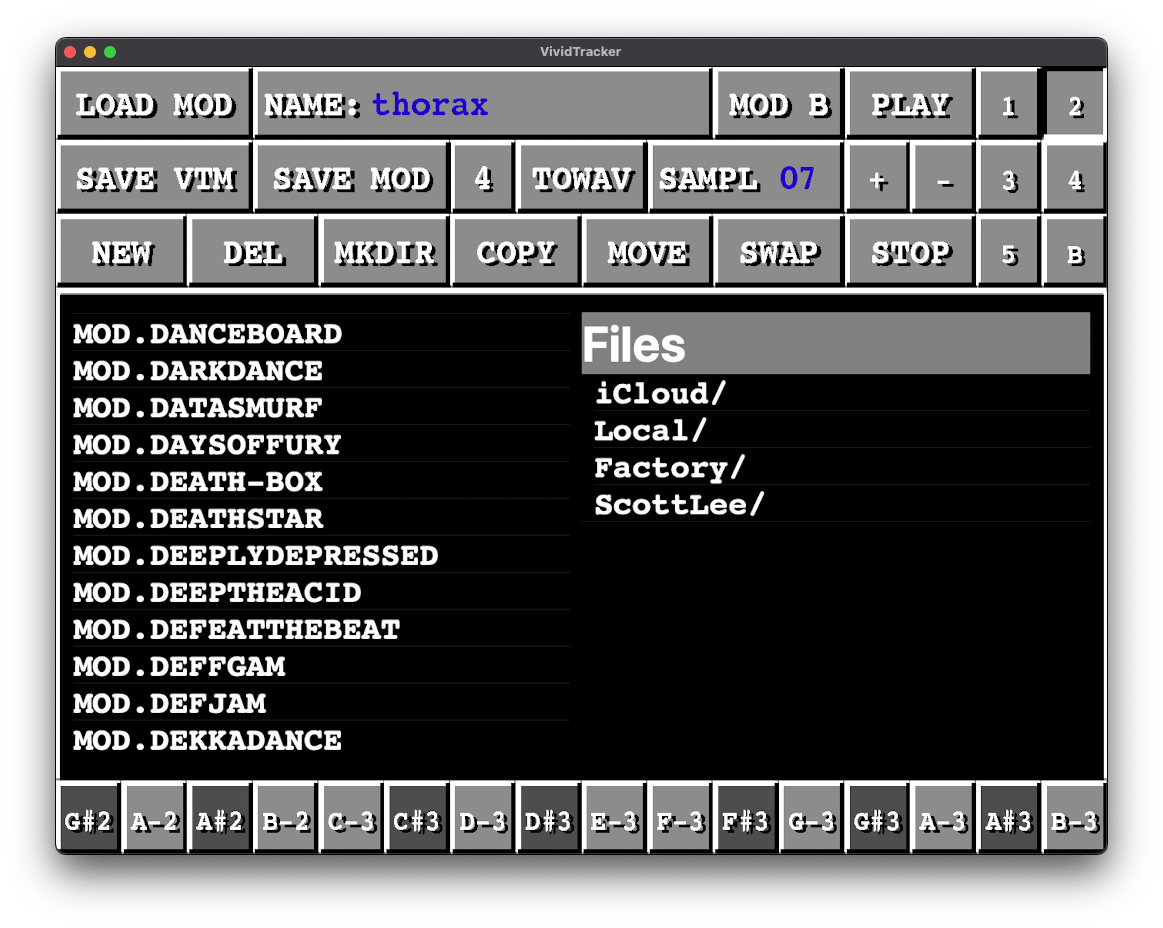
This screen replaces the Samples table with another file browser. In this mode, the browser works similarly to Directory OPUS on the Amiga or Norton Commander on the PC. You can browse and load files from both browsers. There are three new buttons to support this mode:
COPY copies the selected file from one file browser to the other. It works in both directions, so if you select a mod file in the right file browser and press COPY it will be copied to the left file browser. If the location is the same in both browser, it will duplicate the file and set a number before the previous filename, e.g. “MYMOD.mod” will become “1MYMOD.mod”.
MOVE will move the selected file from one file browser to the other. It also works in both directions.
SWAP will swap the location of two file browsers. If your path is ICLOUD/A/B in the left browser and LOCAL/C in the right browser, SWAP will set the left browser to LOCAL/C and the right browser to ICLOUD/A/B.
TOWAV will render the whole mod-file to a wav-file and save it to the location in the left browser.
MOUNT will let you mount another directory that is outside of VividTracker's file system, for instance Downloads on your iPhone. When you press MOUNT, a file picker will appear where you can select a folder. You can also mount folders from other apps as long as they are sharing their files, e.g. AUDIOCOPY. When you have mounted the folder, e.g. Downloads, you will find a new row Mount/Downloads in the Files table and you can enter and manipulate files from the folder too.
Commodore 64 Ultimate companion features
On Screen 2B, you can also configure access to a Commodore 64 Ultimate (C64U) or Gideon's Ultimate 64, so that VividTracker can work as a companion app to the C64U.
C64U lets you upload mod-files and immediately play them on the C64U, which has a built in mod player (you need to configure it first, see C64U CONF below). If you have not selected a mod-file, it will save your currently loaded mod-file to a temp file and upload it. If you have selected a mod-file, it will upload that file instead. This feature is not limited to mod-files. You can also upload cartridge files (crt-files), programs (prg-files), sid-files, and the C64U will automatically run them. If you upload a disk image, you will be asked if you want to mount it on drive A or drive B.
C64U CONF lets you configure the access to the C64U. You need to enter the IP address and optionally enter a password if you have password-protected the C64U. If you don't know the IP-address, you can press the Find button at it will search for the C64U on your local network. Once you have entered an IP address and pressed OK, you will find a new folder called C64U/ under Files, which is from the FTP-server on the C64U.
In the C64U folder, you will find the same file structure as on the C64U itself and you can upload and download files :
This is how the same file structure looks like on the C64U:
Screen 3A
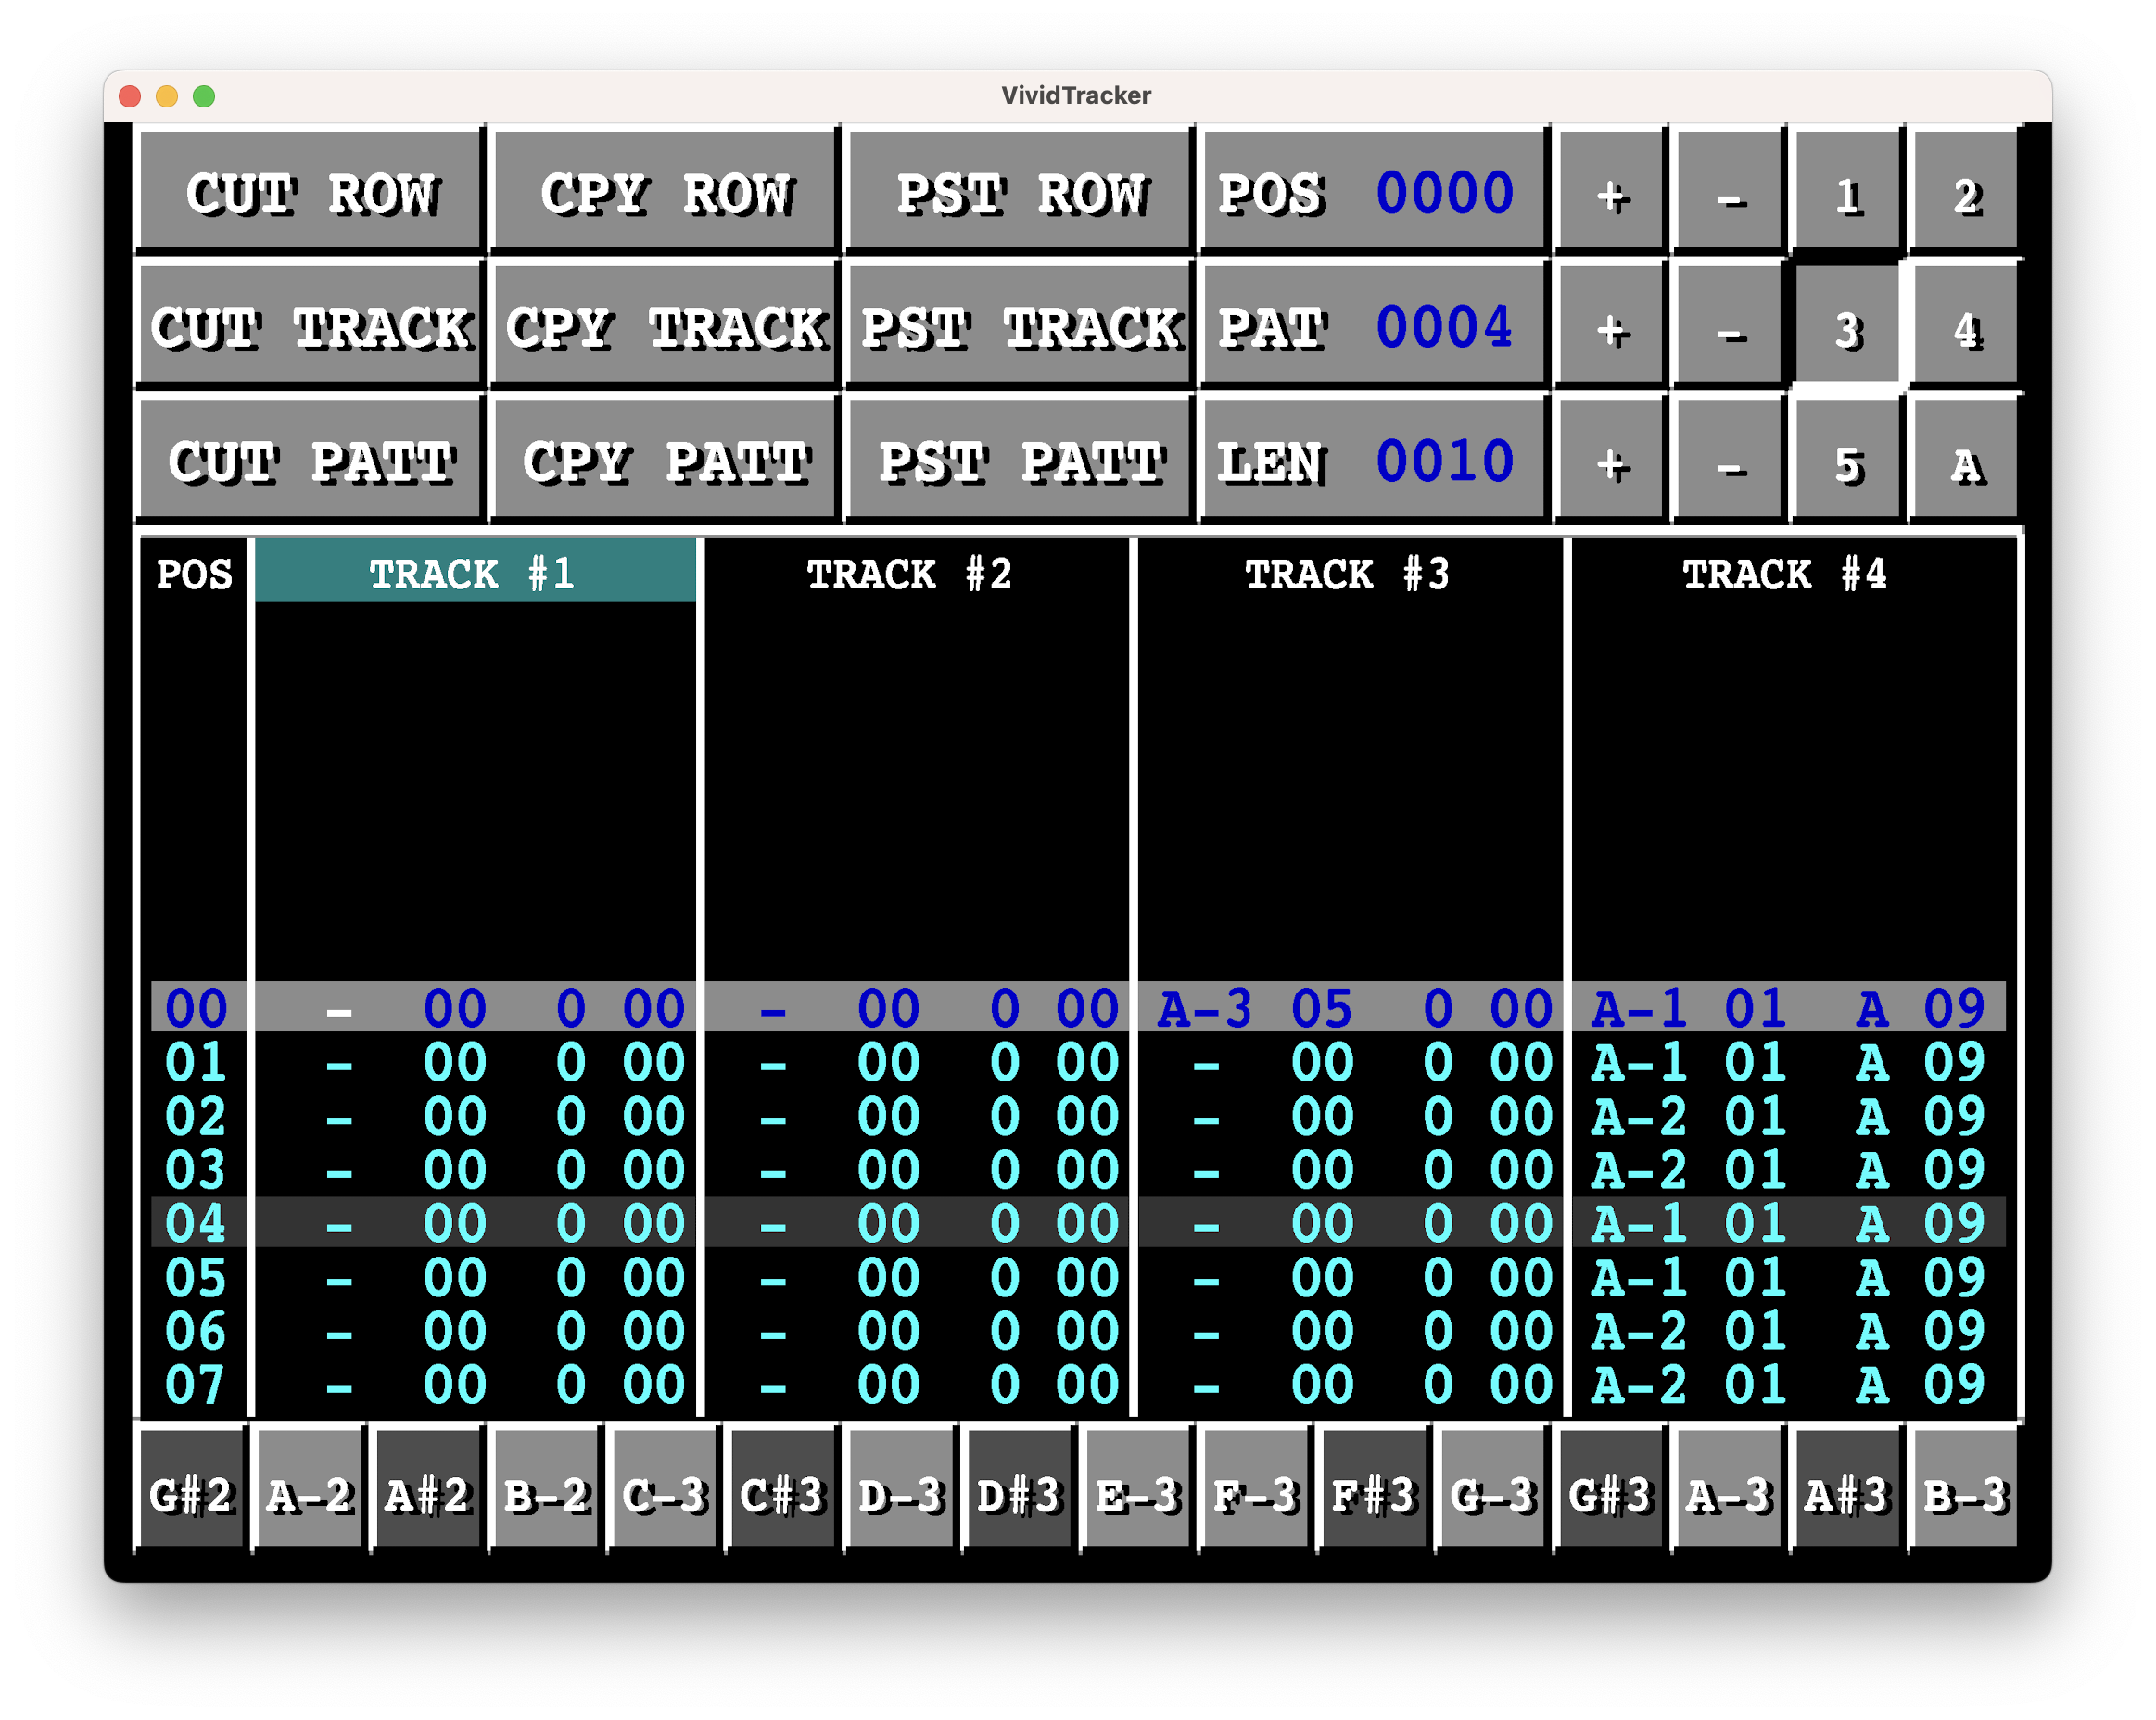 This screen should be self explained. It let's you do cut, copy and paste of a row, a track, or a full pattern. You also have access to the song sequence controls here (i.e. the POS, PAT, and LEN controls).
Screen 3B
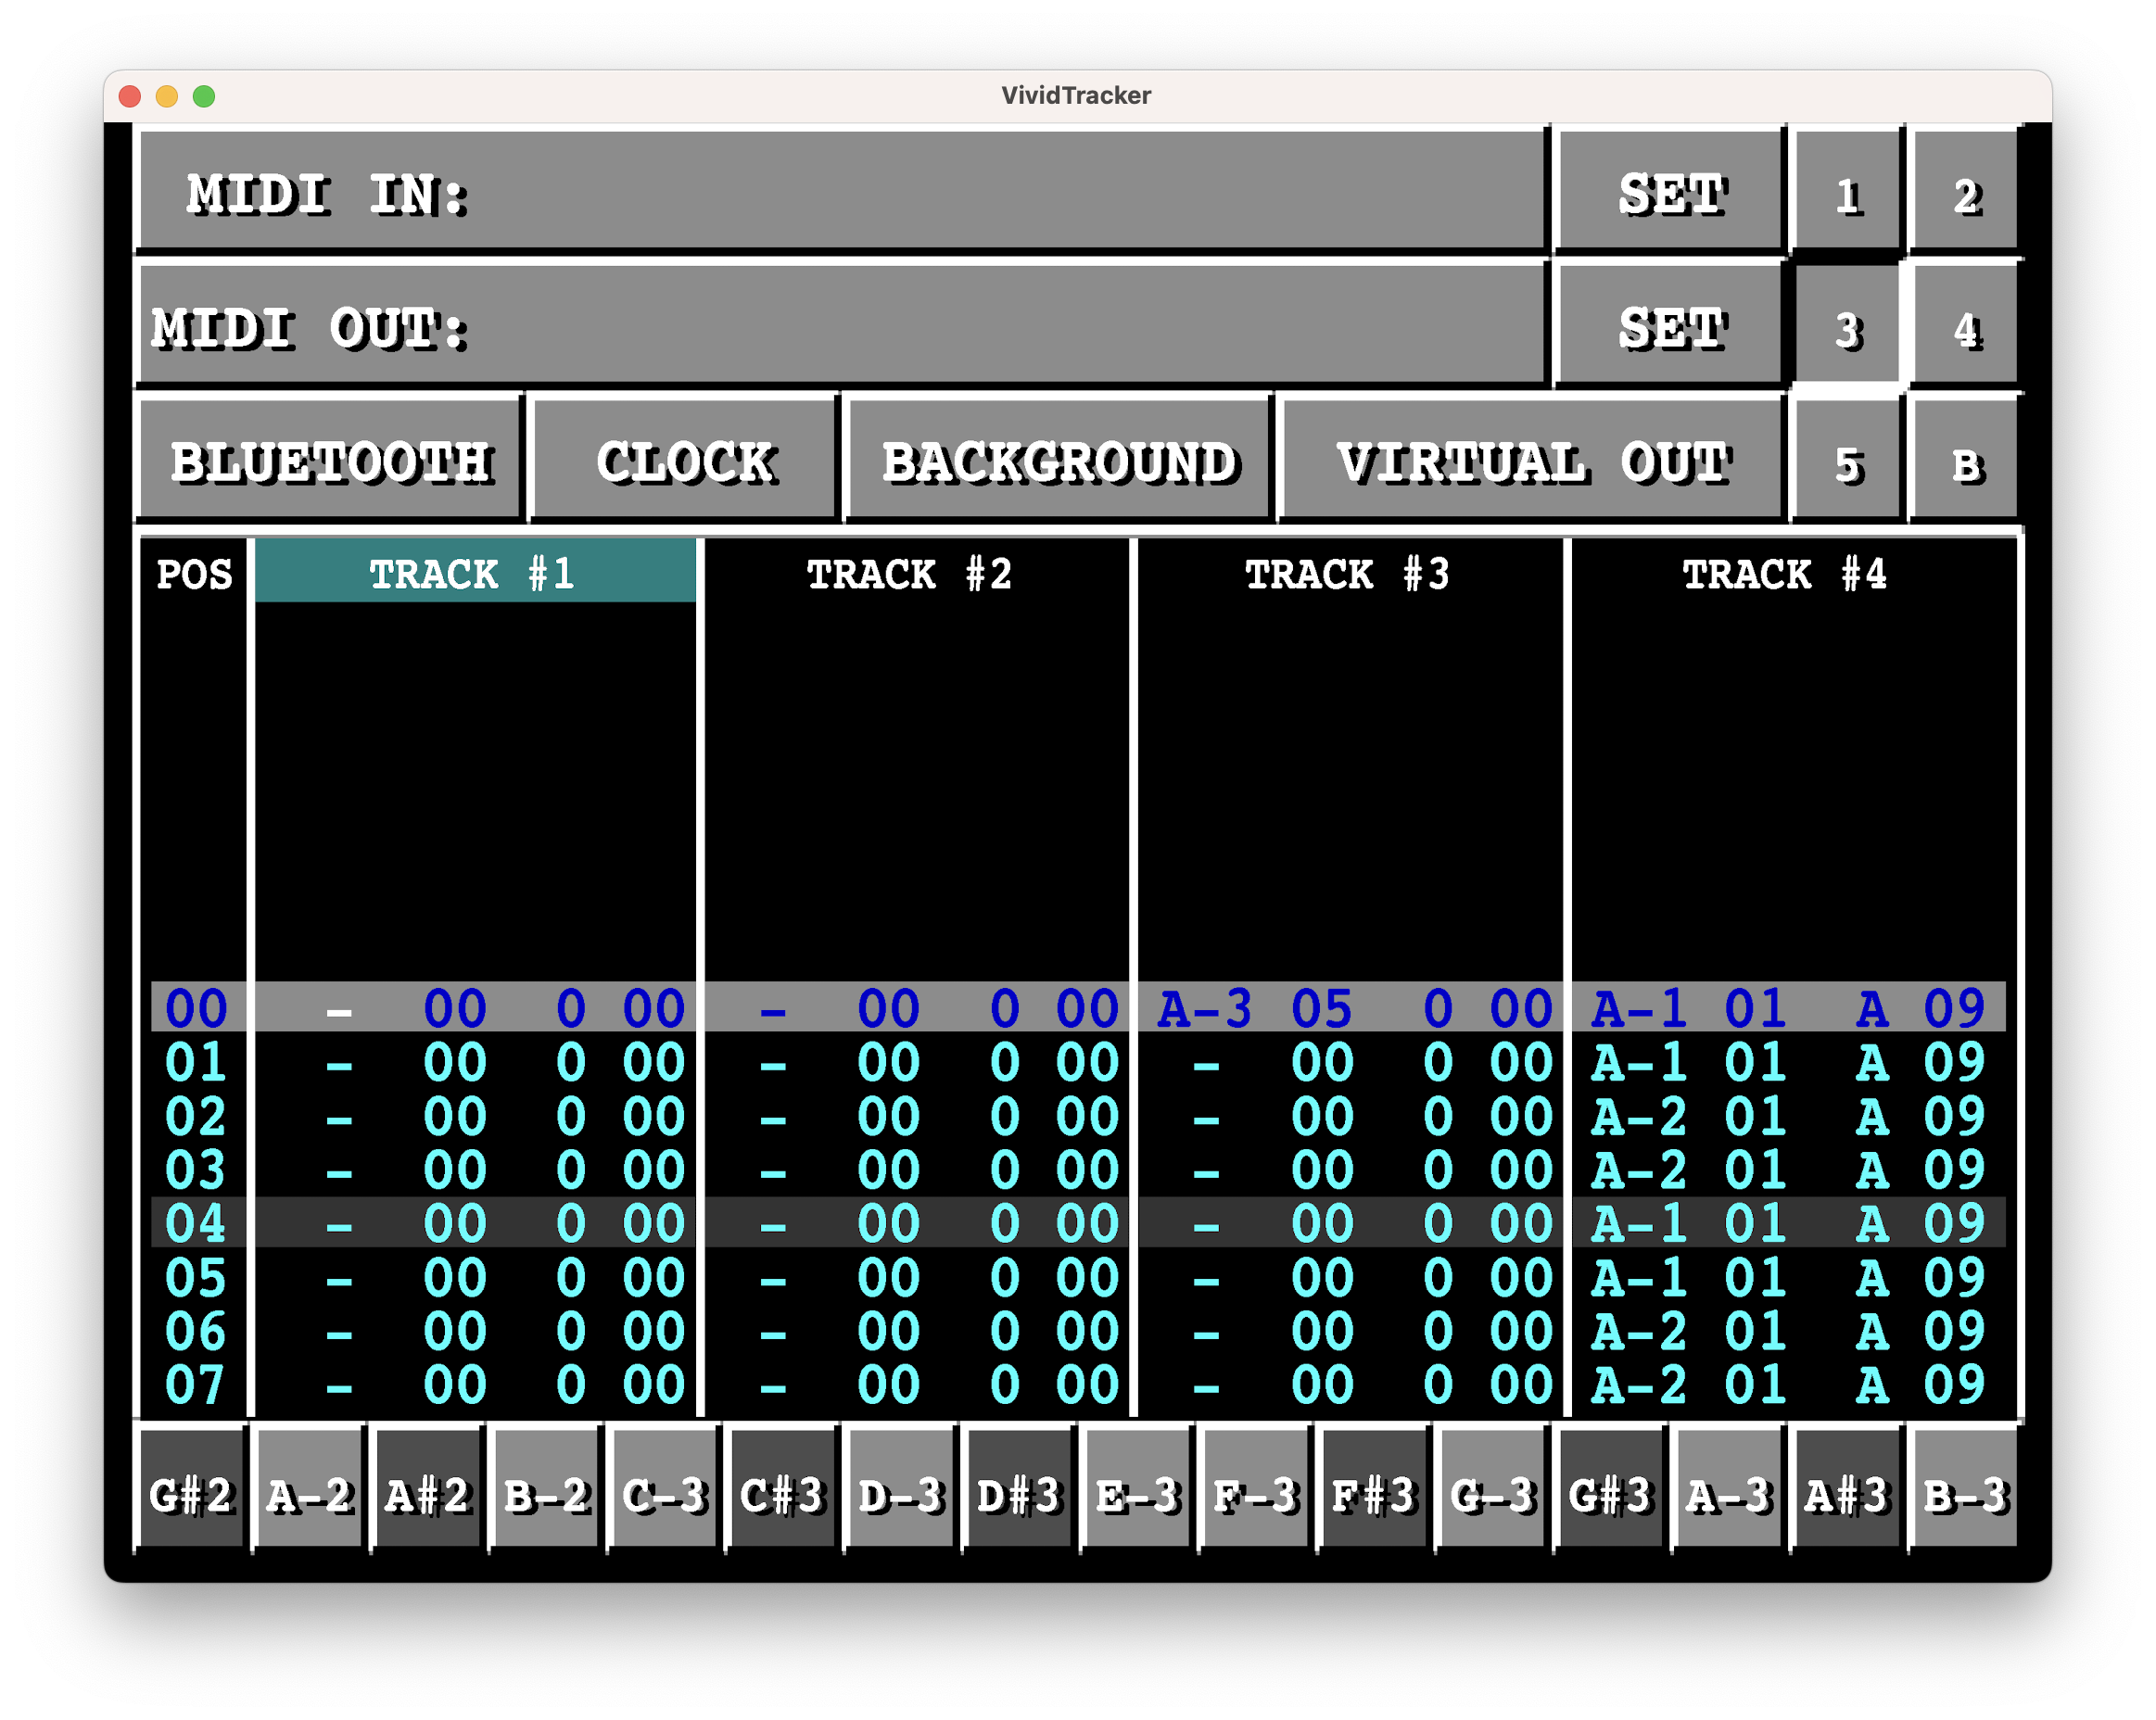 This is the MIDI screen. Press SET next to MIDI IN to set your MIDI input device. Press SET next to MIDI out to set your MIDI output device. Press BLUETOOTH to set up MIDI bluetooth. Select CLOCK if you want VividTracker to send MIDI clock to other devices. Select BACKGROUND to enable VividTracker to run in the background and still receive MIDI messages while not playing. Select VIRTUAL OUT to allow MIDI output to other apps through virtual MIDI.
Screen 4A
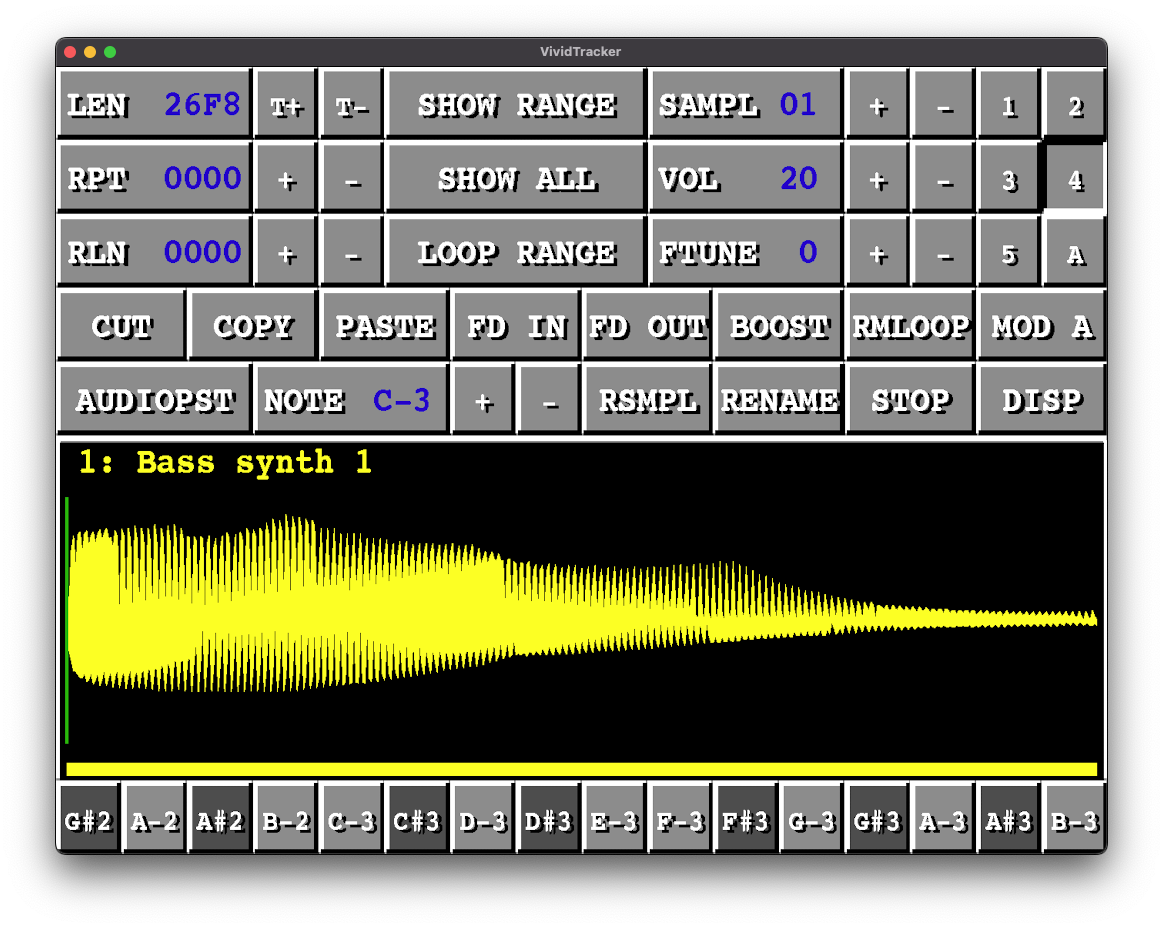 This is the sample editor. Most of it should be clear if you have used the sample editor i Protracker. You can select an area in the sample by moving your finger across the screen (left to right). You can remove the selected area by a single tap on the sample. If you import a sample longer than 65536 bytes, you will see that the part extending 65536 is in red. This means this part will be gone when you save a module, because it extends the sample limit. You can still listen to the whole sample by pressing DISP.
LEN, RPT and RLN are the same as in Protracker (where they are called LENGTH, REPEAT, and REPLEN). Next to LEN is a CLEAR button. If you press this button, you will erase the sample.
SHOW RANGE is the same as in Protracker. It will zoom in and just show the selected area.
SHOW ALL is also the same as in Protracker. It will zoom out and show the whole sample again.
LOOP RANGE let's you set the loop points given the area you have selected.
CUT will remove the selected area from the sample. It will remove the whole sample if you haven't selected a specific area. If you have loaded a sample that is longer than the allowed 65536 bytes (painted in red), it will first cut that part out.
COPY will copy the selected area. It will copy the whole sample if you haven't selected a specific area.
PASTE will replace the whole sample with the copied area. This let's you copy a part of a sample (for instance a kick drum in a drum loop), switch to another sample and replace that sample with the sample you just copied.
FD IN and FD OUT will fade in or fade out the selected area. This is very nice if the amplitude of your sample isn't zero at the end. Then you can use FD OUT at the end to make it sound better.
BOOST let's you boost the whole sample.
REMOVE LOOP removes the loop points.
VOL let's you select the volume of the sample (from 0 to 64).
FTUNE let's you fine tune your sample (just like in Protracker).
AUDIOPST (AudioPaste) is a feature you will probably use a lot. VividTracker supports AudioCopy, and this button will let you AudioPaste samples from other apps. You should read more about AudioCopy to learn about the details of it. The sample will be resampled to the note that you have selected next to the AUDIOPST button (default note is C-3). The note information is also used in the percussion mode.
NOTE is the default note for this sample. It is used in percussion mode, where you can use the keyboard to play different samples, or by the DISP button. It is also used with AUDIOPST and RSMPL. You can set NOTE to be anything between C-1 to C-5. However, C-4 to C-5 are not supported for playback in Protracker, so you should only choose notes above B-3 for resampling purposes.
RSMPL allows you to resample a note from one note to another. It always assumes the default note is C-3. Example: If you select D-3, you will resample the note from C-3 to D-3, i.e. upsample it with two semitones. If you choose C-4, you will resample with a full octave.
RENAME will let you rename your sample.
STOP will stop the sample from playing.
DISP is the same as DISPLAY in Protracker, and will let you listen to the selected range or the selected area. It will play back the sample with the selected NOTE. DISP can play samples above B-3, so you can get audio feedback when resampling. Also, DISP can play parts of the sample that extends 65536 bytes.
MOD A (or MOD B) allows you to swap between two modules A and B. See Screen 1B for further information.
Screen 4B
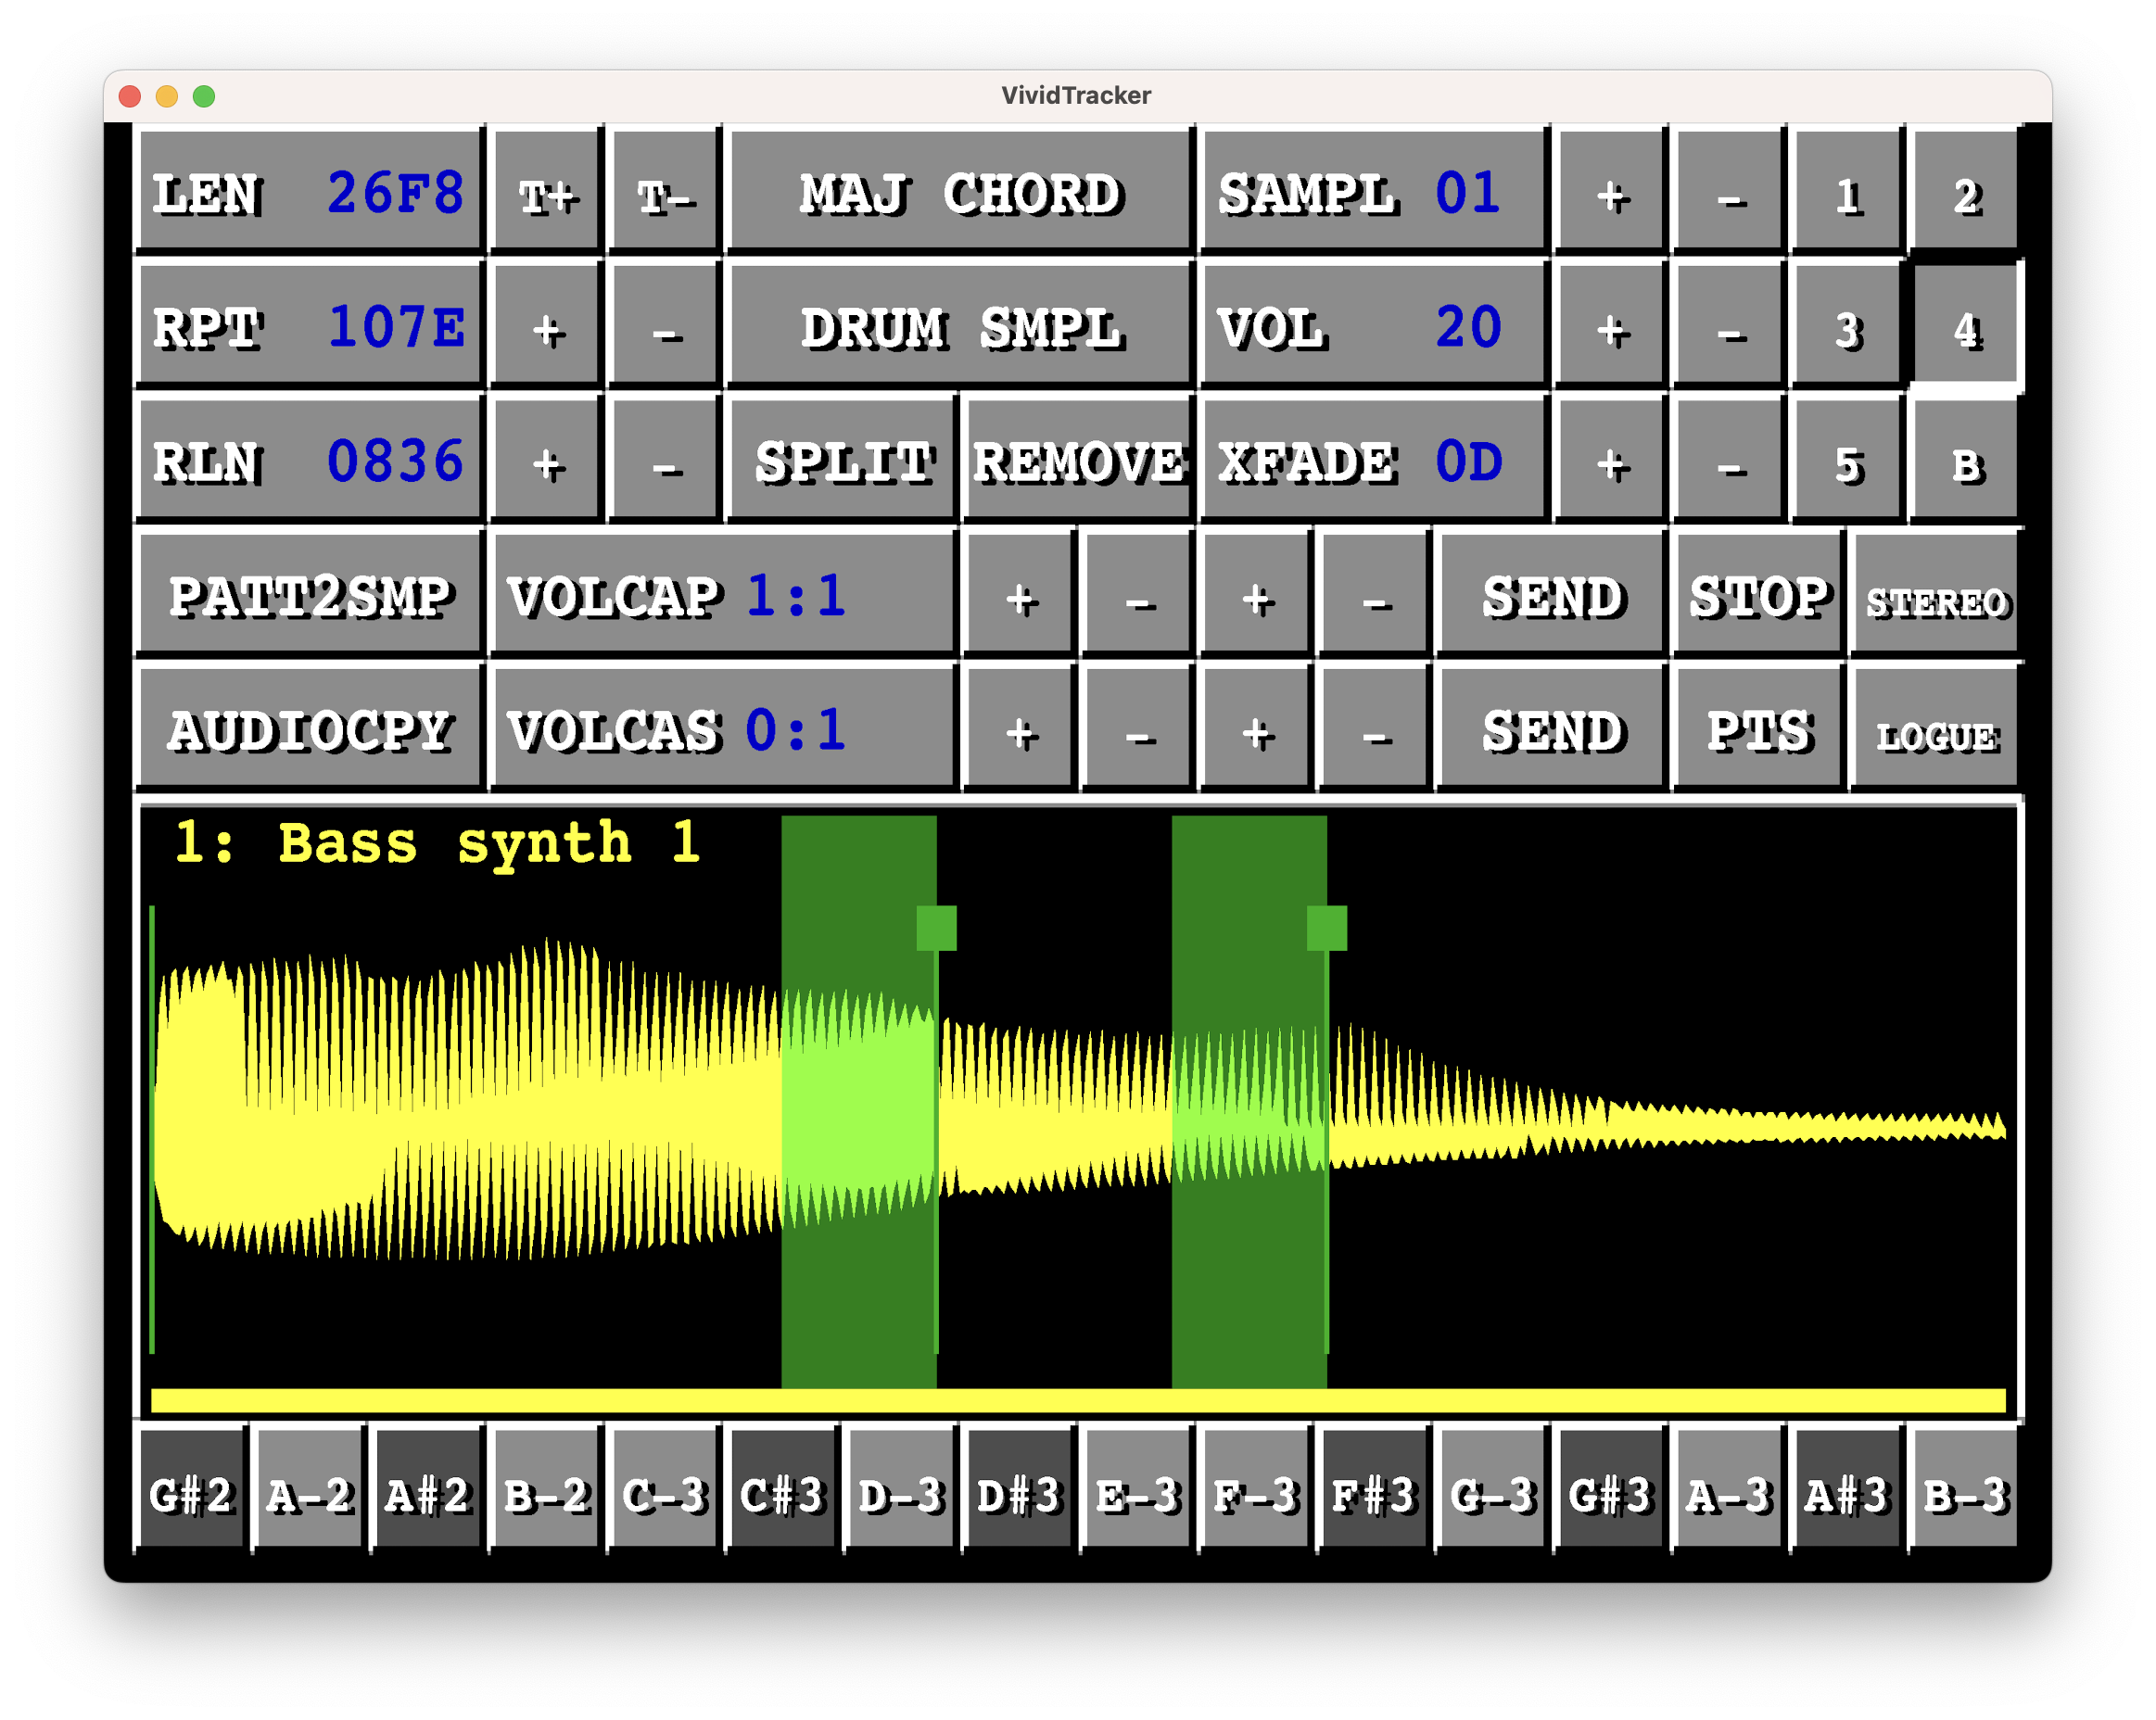 This screen is almost the same as 4A.
PATT2SMP will play the current pattern and make it into a sample to the current sample position (make sure you select an empty sample).
AUDIOCPY will play the current pattern and copy it to the AUDIOCOPY app.
The FTUNE is replaced by XFADE, which is a powerful feature to interpolate loop points in a sample to reduce clicking sounds at the end points. The issue with loops in Protracker is to find the perfect spot for the loop to start and end. If the start and end of the loop has very different values in the sample (e.g. 20 at the start, 50 at the end), you will hear a clicking sound. If you have a loop and press the XFADE + button a couple of times, you will see a green area before both loop points. When you press down the XFADE button, the sample data from the first green area (before the first loop point) will be interpolated over to the second green area (before the second loop point), effectively making sure that the sample values at the loop points are the same. You can select how large the green area should be with the +/- buttons. An example of this is shown in the image above.
There is a STEREO button next to the STOP button. This is a toggle button, so by pressing it once it will remain pressed down until you press it again. Selecting STEREO-mode here tells VividTracker to split a sample you import into two samples in VividTracker, one for the left channel and one for the right channel. This allows you to copy and play stereo samples.
Then we have two buttons that are used for the Auto Chord feature. We will go through the Auto Chord feature soon. For each sample, we can select if this sample is either a drum sample or a major chord (or both, which is a little bit strange but you can do it anyway). If you save your mod-file in VTM-format, these settings will be stored. They will not be stored if you save your mod-file in MOD format, since the MOD-format does not have this information.
There are also two buttons for splitting and removing samples: SPLIT and REMOVE. You can use SPLIT to split a sample into two samples of equal size. Samples above the current sample will be pushed up with incremented sample number. REMOVE will remove current sample from the current number at put it last, i.e. at sample position 31 (so it won't delete it). All the samples above the current sample will be pushed down, so that sample x will become x-1, etc.
Korg prologue, minologue xd, NTS-1 support
VividTracker can send samples as user oscillators to Korg prologue, Korg minologue xd, and Korg NTS-1. The sample size is limited to 25 kB. The playback routine for the Korg has been specifically developed to be able to play back Amiga samples, which means it retains and accurately also play back any loop settings you have in your sample.
You can only upload one sample per user oscillator. First, you select the sample you want to upload. Make sure it is within the 25 kB limit. You will get a message if the sample is too long. Then, press the LOGUE button. You will be asked for an oscillator name and if you want to store it as a prologue, minilogue xd, or NTS-1 oscillator. It does not really matter, because all three synthesisers can read each others oscillators anyway. However, it may be convenient to store it as e.g. Korg minilogue xd if that is your main synthesiser that you will use for these oscillators.
The oscillator will be stored to the location you have selected in the right file browser on screen 2. You may get a message saying: “Cannot store to this location”. This means you have selected a location which you cannot write to (e.g. “Factory/”). You need to go back to Screen 2 and change the location in the right file browser.
Volca Sample features
VividTracker has support to both send pattern data and sample data to the Korg Volca Sample (and the updated version Korg Volca Sample 2). Korg Volca Sample is a small sample sequencer from Korg that is really fun to play with. Data is sent using the audio, so you need to connect an audio cable to your Volca Sample.
Transmitting samples:
Transmitting samples work in a similar way. The Volca Sample has 100 samples (0 to 99) and the Volca Sample 2 has 200 samples. You can transmit one sample at a time or batch upload more than one sample. Start with selecting the sample you want to upload, e.g. sample 5. The first number in the VOLCAS settings tells which sample slot you will upload to, the second number tells how many samples you will upload (from the currently selected sample and onwards). Here are three examples:
Say that you have selected sample 5 and you set the VOLCAS settings to “10:3”. You will then upload three samples, from sample 5 and onwards. In other words, you will upload sample 5, 6, and 7. These will be uploaded to sample slot 10 and onwards in the Volca Sample. In other words, you will upload the samples to sample slots 10, 11, and 12.
Say that you have selected sample 1 and you set the VOLCAS settings to “0:1”. You will then upload sample 1 to sample slot 0 in the Volca Sample.
Say that you have selected sample 1 and you set the VOLCAS settings to “20:31”. You will then upload all the samples (1 to 31) to slot 20 and onwards in the Volca Sample.
Transmitting patterns:
The VOLCAP button is for sending pattern data to Volca Sample. The Volca Sample has 10 patterns and the Volca Sample 2 has 16 patterns, each pattern with 16 steps. This means that a pattern in VividTracker (64 rows) corresponds to four patterns in Volca Sample. You can see that the button reads “VOLCAP 1:1” in the image above. The first number represents which pattern slot on the Volca you want to send the pattern to. The second number represents how many patterns you want to transmit at the same time. You can use the +/- buttons on the right to change the numbers.
Up to four Volca patterns can be transmitted at the same time. It is the current VividTracker pattern that you have selected that will be transmitted to Volca Sample. If you select that you only want to send one pattern, then only the first 16 rows will be transmitted. If you select that you want to send two patterns, the first 32 rows will be sent as two Volca Sample patterns (16 steps each). If you select that you want to send four patterns, you will divide the current VividTracker pattern into four Volca Sample patterns with 16 steps each.
Each pattern on the Volca is made of 10 parts, but parts 9-10 are “alternating” so VividTracker will only use the first 8 parts, allowing to play 8 different samples at the same time. Each part can only play one particular sample. The arrangement of a pattern is therefore a little bit different than in VividTracker. In VividTracker, each pattern is made out of four (or eight) tracks where each track can play back any sample at any row. Therefore, a VividTracker track does not correspond to a Volca Sample part. You could see a Volca Sample part as corresponding to a particular sample having particular notes.
The translation is done in the following way: First of all, the selected VOLCAS sample number will define which Volca sample corresponds to sample 1 in VividTracker. Say that you have selected “VOLCAS 0:1”. This would mean that Volca sample 0 corresponds to sample 1 in VividTracker, Volca sample 1 corresponds to VividTracker sample 2, etc (the number after the colon has no effect here). If you have selected “10:1”, then Volca sample 10 corresponds to VividTracker sample 1, Volca sample 11 corresponds to VividTracker sample 2, etc. In this example, we will assume that we have selected “0:1”.
VividTracker will loop through which samples are used in the first track. Say that sample 1 and 5 are used. They will then be given the parts 1 and 2. VividTracker will then move on to the second track. Say that sample 3 and 5 are used. They will then be given the parts 3 and 4. Say that we are not using track 3 and 4. We will then have the following arrangement:
Track 1, sample 1: These notes will be sent to part 1, and given the sample number 0. Track 1, sample 5: The notes for sample 5, track 1, will be sent to part 2, and given the sample number 4. Track 2, sample 3: These notes will be sent to part 3, and given the sample number 2. Track 2, sample 5: These notes will be sent to part 4, and given the sample number 4.
However, say that you want to use samples from 21 and onwards on the Korg Volca Sample to correspond to samples 1 and onwards in VividTracker. You will then set VOLCAS to “21:0”, where VividTracker sample 1 will be given the sample number 21, sample 2 will be given the sample number 22, and so forth.
Here are three examples of how to send different patterns:
Say you have selected pattern 5 in VividTracker. You want to send the first 32 rows of this pattern into pattern slots 5 and 6 of the Volca Sample. You want sample 1 in VividTracker to correspond to sample 1 in Volca Sample. Then you select “VOLCAP 5:2” and “VOLCAS 1:1”, meaning that you want to transmit two patterns, 16 rows each, from pattern slot 5 and onwards, and you want sample 1 in VividTracker to correspond to sample 0 in Volca sample.
Say you have selected pattern 2 in VividTracker. You want to send all 64 rows as four patterns to the Volca Sample, starting from slot 1. You want sample 1 in VividTracker to correspond to sample 11 in Volca Sample. Then you select “VOLCAP 1:4” and “VOLCAS 11:0”.
Say that you only want to send the first 16 rows of pattern 4 in VividTracker to slot 10. You want sample 1 to correspond to Volca sample 0. Then, you select pattern 4 in VividTracker, “VOLCAP 10:1”, and “VOLCAS 0:1”.
Yes, it is a little bit complicated but if you play around with this you will get the hang of it.
Once done, you press the SEND button. The patterns will now be transmitted to the Volca Sample using audio. Please read the documentation on Korg Volca Sample on how to transmit data.
Screen 5A
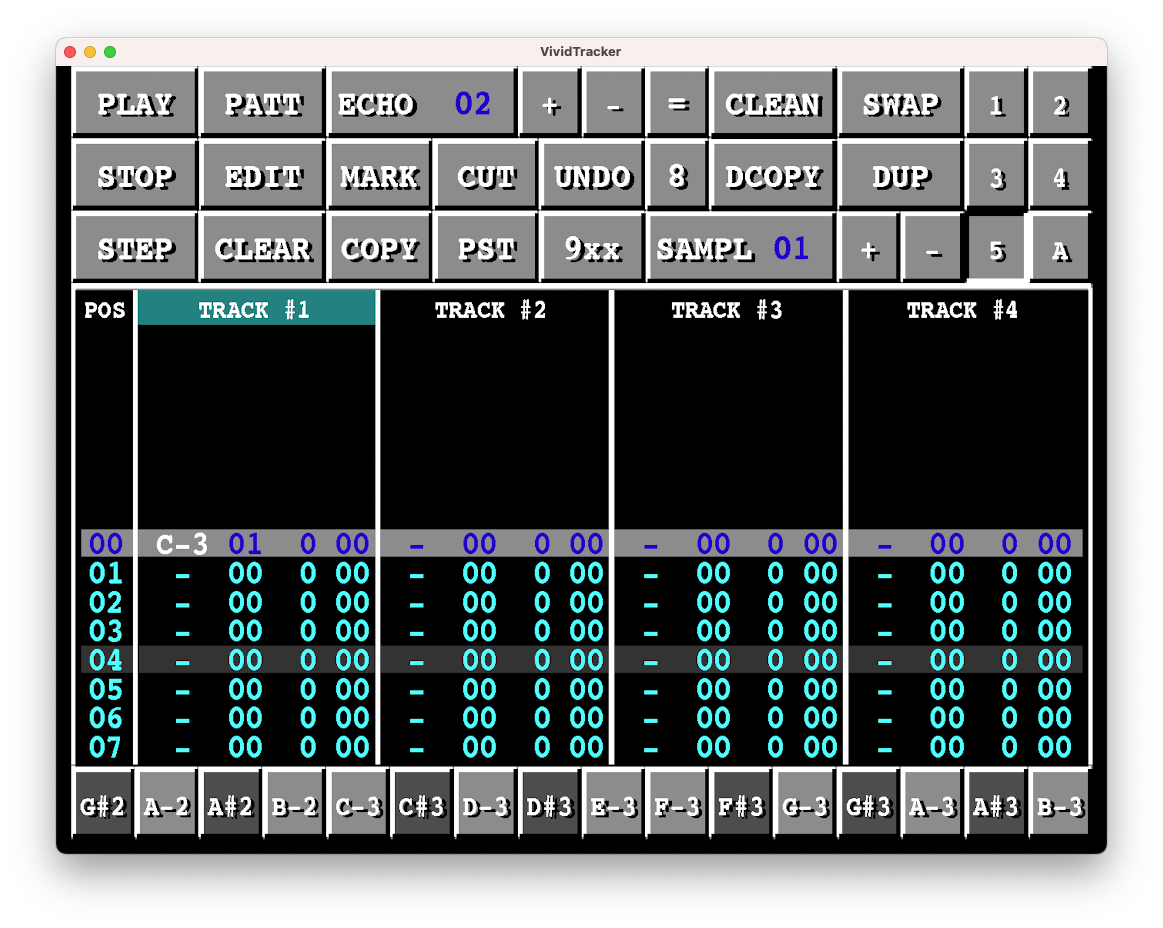 Some buttons from SCREEN 1 are represented here as well, so let's go through the unique buttons:
ECHO is a nice little feature that allows you to create an echo effect of notes in the pattern. If you have a note, e.g. C-3, this feature will echo it a number of rows later with half of the volume. You can select the number of rows using the +/- buttons (the default value is 2). The effect will only take place in the track where you have your cursor and it will only be applied on the currently selected sample. The effect will only create one echo, but you can press the button again to get more echos. The button you press is the button with the “ECHO xx” text in it, i.e. it's not a separate button.
The “=” next to echo is a button telling where the echo feature should store the echos. Press this button to change where to store the echos. = means the same track, > means the track to the right and < means the track to the left.
MARK will allow you to mark rows in the current track. When you press it, you will see that the current row for the current track turns green. If you then move to another row with your finger, you will mark all the rows in between with green. The +/- buttons next to echo will transpose the marked rows if you are in marked mode.
COPY will copy the marked rows. When you press COPY, the MARK button will be released.
PST will paste the copied rows from the row where you are standing, and will then jump over the pasted area. This is a nice feature that allows you to e.g. copy rows 00 to 03, and then quicky repeat these rows many times through the track by pressing PASTE a number of times.
9xx will fill the marked rows with 9xx commands, so that it plays the current sample interpolated across the selected rows.
CUT will erase the marked area.
SWAP will swap the currently selected sample with the next sample. Note that this will also change all the samples in all the patterns, so the module will sound exactly the same afterwards. This is just a method to arrange the order of the samples.
CLEAN will go through all the samples and look for if they are used in the patterns or not. Any sample not used will be removed.
DCOPY will copy the first N rows of the selected track (where N is the number in the “number” button to the left) and duplicate it throughout the track. You can toggle what N should be on the button to the left by tapping on it. Default value is 8. The different values are: 4, 8, 16, 32.
DUP is similar to DCOPY. In this mode, anything you enter in the first N rows (defined by the “number” button) will be duplicated to the other rows. For instance, if N=8 and you enter a note on row 1, the same note will be entered on row 9, row 17, row 25, etc.
Screen 5B
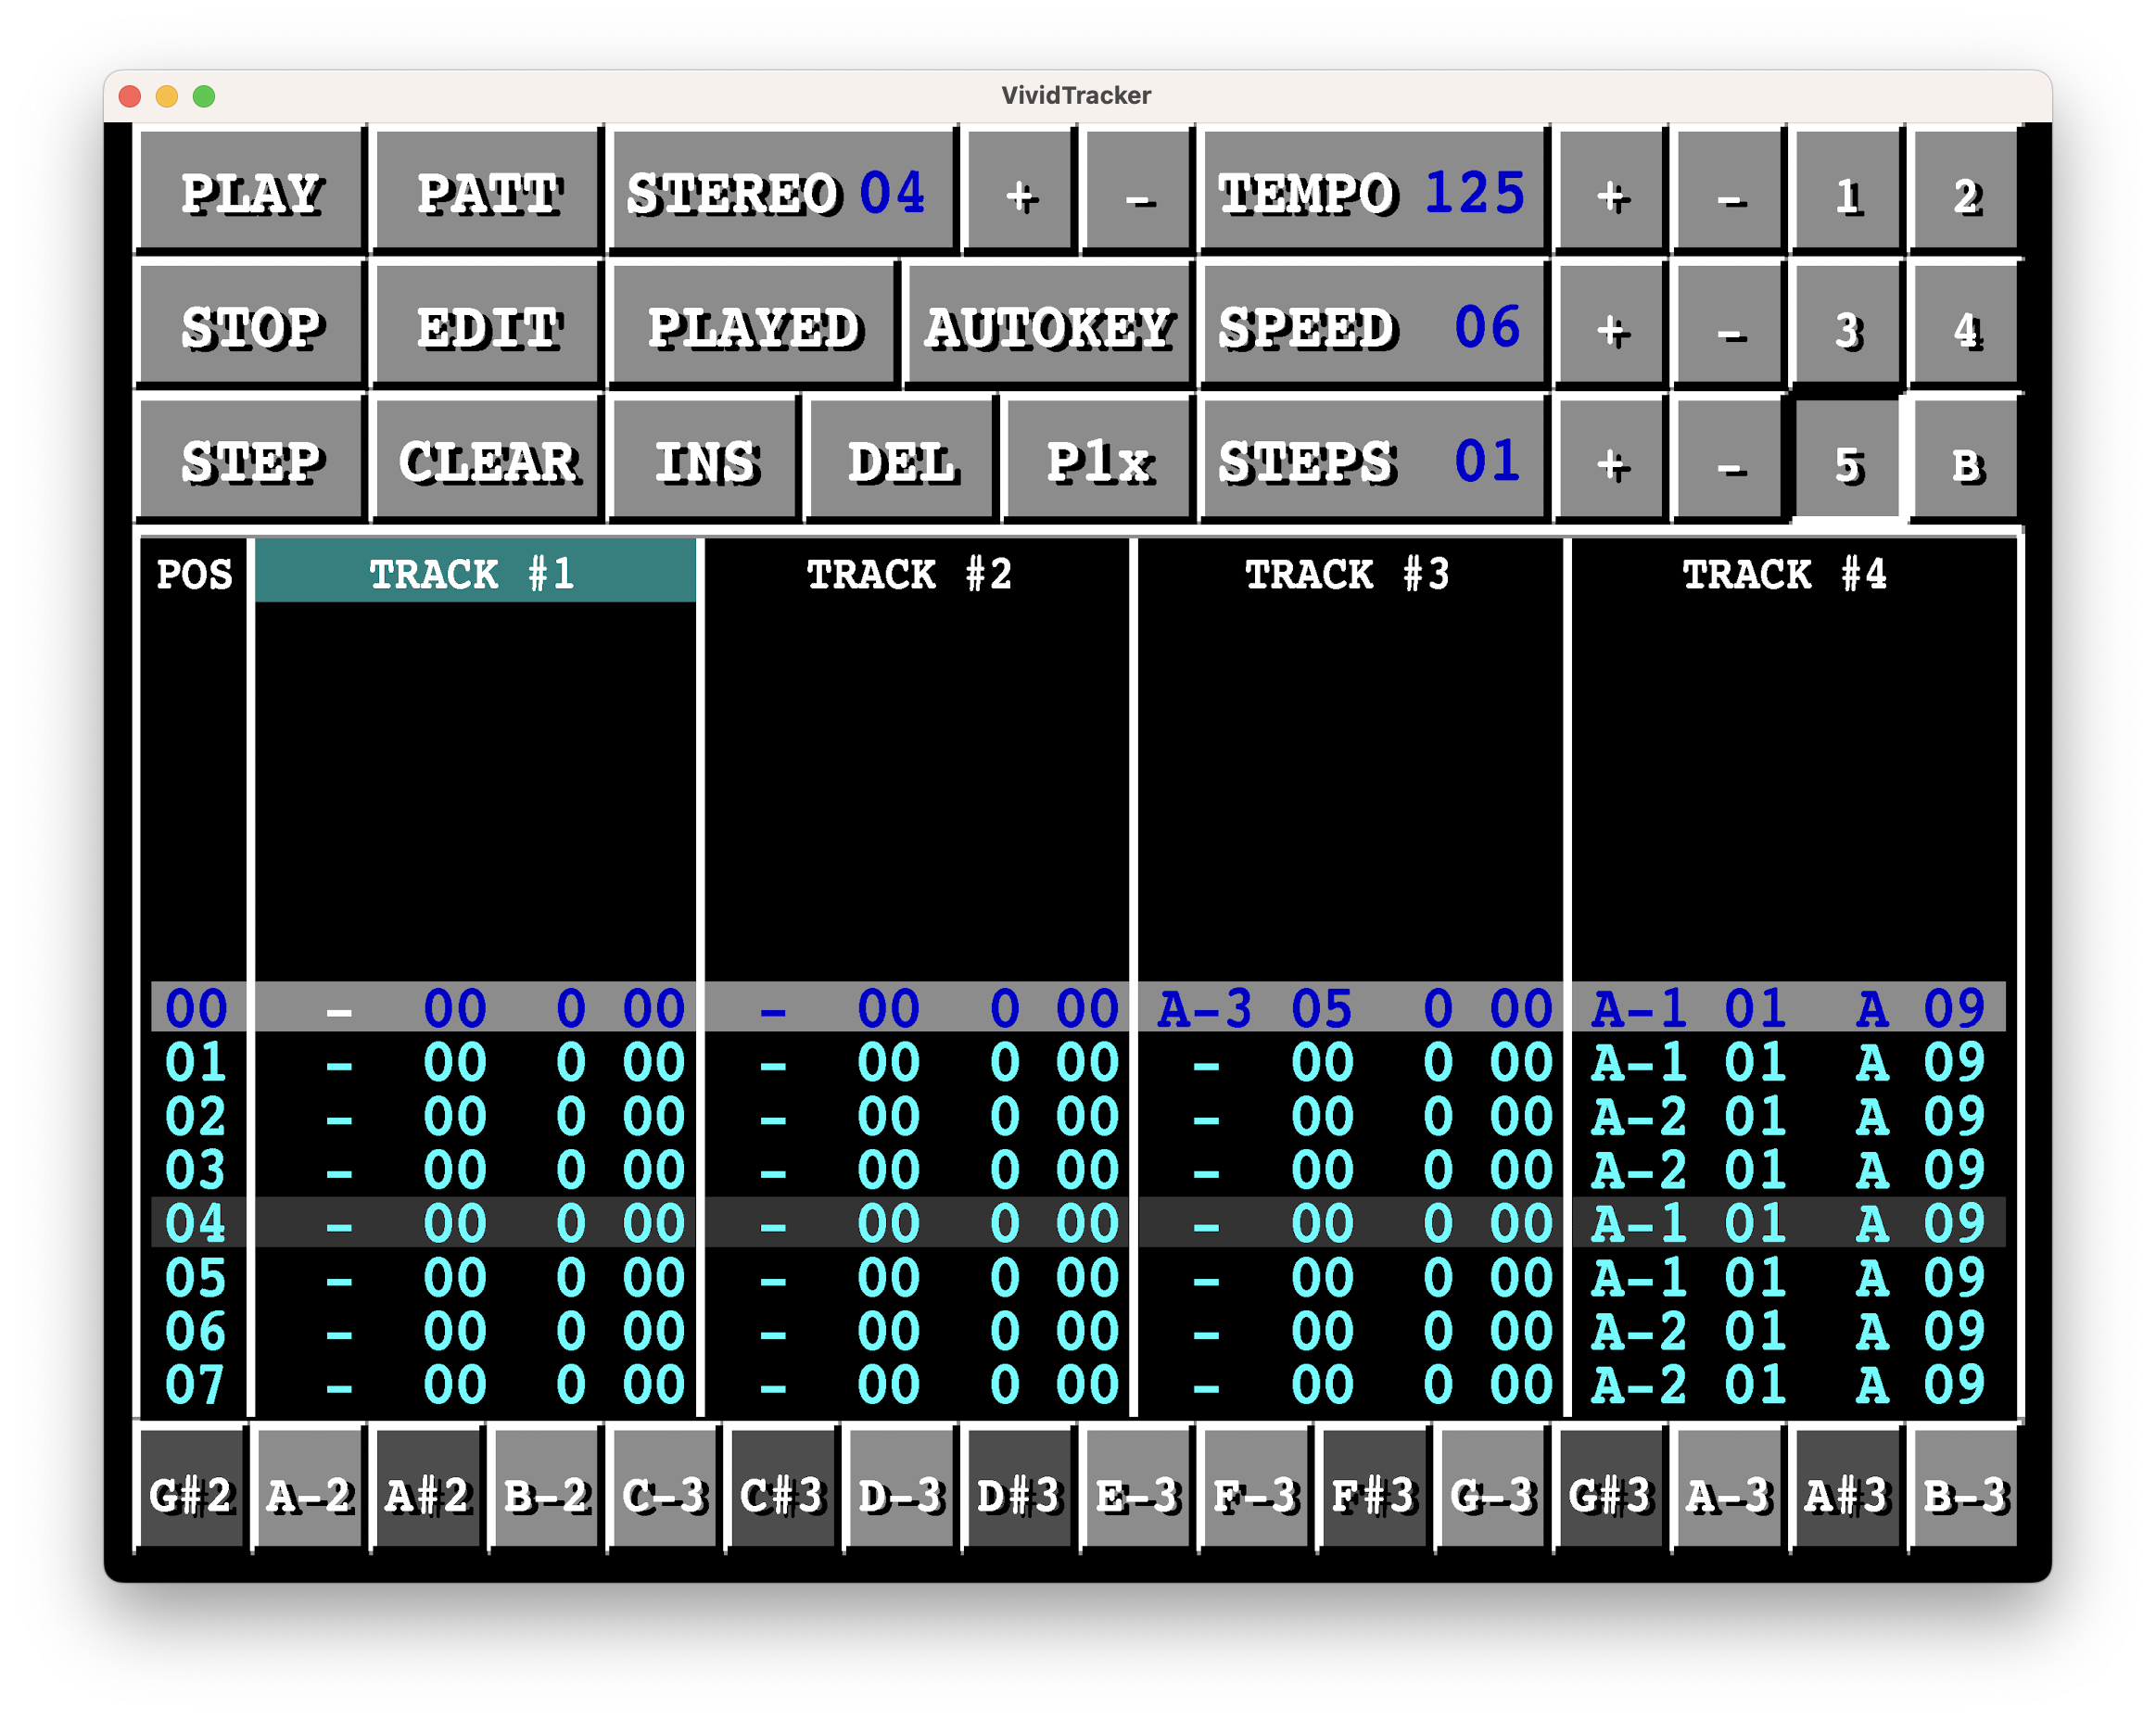 PLAY, STOP and PATT are the same as in SCREEN 1.
STEREO sets the stereo level, from mono to complete stereo (0 to 16).
P1x will play the pattern from row 00 down to the last row and stop. This is nice if you are using Audiobus to copy a pattern from VividTracker to Garageband or Cubasis.
B-AU is an important button. If you want to use another app as MIDI-source and play samples in the background, you must turn on background audio. The default mode is that it is turned off to save power. You don't have to care about this button if you are using Audiobus, but you need to turn it on if you are going to use any other app as a MIDI-source (virtual MIDI). Background audio is however always on if you are playing a module (either using PLAY or PATT).
TEMPO and SPEED are the same as in Protracker. You can change the settings manually, but they will change if there's a tempo/speed command in the pattern that is being played.
INS inserts a row in the current track and the current row
DEL deletes the current row in the current track
SCALE let you select a scale for the notes in the keyboard. Normal mode shows all the notes (chromatic scale), but with SCALE you can select from 30 different scales, including exotic scales like Yo or Iwato for Japanese scales, and more western type of scales like the Harmonic or Pentatonic scales.
Once you have selected a scale, the last button will turn blue and show which key the scale is set to. The default is C, but if you want to change it to e.g. A, you can press the blue button. The blue button will remain pressed and the keyboard will in this mode display all the notes from C to B. By pressing one of the keys, you will select a new key for the scale. If you regret and don't want to select a new key, you can just press the blue note button again to release it. If you use a qwerty-keyboard for entering notes, the keys will behave differently as well when you have selected another scale than chromatic. Read more about that in the section about bluetooth keyboard support.
PLAYED let's you see the underlying notes that are played when you are using the Auto Chord feature. We will now go through the Auto Chord in detail.
Advanced features
Auto Chord
Auto Chord is a very nice feature that allows you to auto transpose a C-major pattern to any other chord, e.g. from C-major to A-minor. This saves a lot of time for you, since you don't have to manually transpose every single note. We will now go through in detail how this works.
You know that a row in a track is normally given by note, sample, effect command, and effect parameter, e.g.:
A-2 02 C 30
In this example, we are playing note C-3, sample 02, the effect C (which sets the volume) and the effect command 40 (which is telling the volume to be set to $40). Protracker has effects from 0 to F, but effect 8 is unused and does not do anything in Protracker. In VividTracker, it is used to control the Auto Chord feature. When you set the effect to 8, VividTracker will make a different interpretation of the data you enter. Here is an example:
A-2 xy 8 zz
This command will tell VividTracker to copy pattern data from pattern zz and track y, then auto transpose it from C-3 to A-2. VividTracker assumes that all the pattern data in pattern zz and track y are in C-3 major. A C-3 note will therefore be transposed to A-2, and a G-3 note will be transposed to E-3. Say you are standing in pattern 02, track 1, and you want to copy and auto transpose the pattern data from pattern 01, track 4. You would then write:
A-2 x4 8 01
We have one variable left to define and that is x. If we set it to x=0, we will just copy the pattern data as is and transpose it from C-3 to A-2, i.e. 3 semi-notes down:
A-2 04 8 01
However, if you do that and you are copying a C-major arpeggio (C-3 E-3 G-3), you will get an A-major arpeggio. What if you want it transposed to A-minor? Then you have to set x=8:
A-2 84 8 01
You will notice that VividTracker will either show the character M or m to tell you if it is transposing to a major chord or a minor chord. That means you will see this on the screen:
C-3M04 8 01
and
A-2m84 8 01
In both these cases, VividTracker will copy the from the same row in pattern 01, track 4 as the row where we enter the command. For instance, if we are entering this data in row 16, it will copy the note data from row 16 in pattern 01, track 4. However, once the command has been entered, we don't have to write it again for the next rows. It will just continue to copy and auto transpose row 17, 18, 19, etc. Instead, if we want to turn it off, we should either write this command
- 00 8 00
or just play a note without effect 8. The Auto Chord mode will otherwise be turned off before the next pattern starts.
You can also tell the Auto Chord mode to copy pattern data from row 0 independently of which row you are copying to. For instance, say you are on row 32 but you want to copy the track from row 0 and onwards. In this case, you change the x value from 0 to 4 in major mode, and from 8 to C in minor mode. Now we know what happens when x=0, x=4, x=8, or x=C. What about the values in between? They are used for inversions of the chord. If you want to play the second inversion of the chord, you either enter x=2, x=6, x=A, or x=E. This is very nice, because it gives you a great variety of how you can transpose your track. Here is a full list of all the x-values and their meanings.
x = 0 : Major chord, no inversion, copy current row
x = 1 : Major chord, inversion 1, copy current row
x = 2 : Major chord, inversion 2, copy current row
x = 3 : Major chord, inversion 3, copy current row
x = 4 : Major chord, no inversion, copy from row 0
x = 5 : Major chord, inversion 1, copy from row 0
x = 6 : Major chord, inversion 2, copy from row 0
x = 7 : Major chord, inversion 3, copy from row 0
x = 8 : Minor chord, no inversion, copy current row
x = 9 : Minor chord, inversion 1, copy current row
x = A : Minor chord, inversion 2, copy current row
x = B : Minor chord, inversion 3, copy current row
x = C : Minor chord, no inversion, copy from row 0
x = D : Minor chord, inversion 1, copy from row 1
x = E : Minor chord, inversion 2, copy from row 2
x = F : Minor chord, inversion 3, copy from row 3
Inversions in music theory work differently depending on if you are inverting a C-maj or a C-maj7. If you have an arpeggio going like this
C-3 E-3 G-3 B-3
you have a C-maj7 chord. If you want to invert a C-maj7 chord, you need to tell that. This is done by changing y (the track number) from y to y+4. That means, if you are going to copy track 4, you enter 4+4=8 as y. Example:
G-2M28 8 01
This example will transpose a C-3 major7 chord to a G-2 major7 chord, with an inversion 2 of the chord. Avoid using this command if you only have a C-3 major chord, because it will not sound right. An inversion of C-3 major7 is not the same as an inversion of C-3 major.
Say we want to play the arpeggio C-3 E-3 G-3 as C-maj but we want to invert it with the second inversion. We would then write
C-3M28 8 01
and we would with this command play the arpeggio E-2 G-2 C-3. However, there is another way in which we could play the arpeggio. We could keep the order of the notes and still get the inversion, like this: C-3 E-2 G-2. It is the same chord, it is even the same inversion as it is the same notes, but it is not the same arpeggio. In fact, it will sound quite differently. You can do this too, by changing y (the track number) from y to y+8. Thus, if you are going to copy track 4, you enter 4+8=12=C as y. Example:
C-3M2C 8 01
Here is a list of the various settings for y:
y = 0 : Stop the Auto Chord mode
y = 1 : Assume pattern data is a C-major triad chord. Copy from track #1.
y = 2 : Assume pattern data is a C-major triad chord. Copy from track #2.
y = 3 : Assume pattern data is a C-major triad chord. Copy from track #3.
y = 4 : Assume pattern data is a C-major triad chord. Copy from track #4.
y = 5 : Assume pattern data is a C-major 7 chord. Copy from track #1.
y = 6 : Assume pattern data is a C-major 7 chord. Copy from track #2.
y = 7 : Assume pattern data is a C-major 7 chord. Copy from track #3.
y = 8 : Assume pattern data is a C-major 7 chord. Copy from track #4.
y = 9 : Chord can be C-maj or C-maj 7. Keep note order. Copy from track #1.
y = A : Chord can be C-maj or C-maj 7. Keep note order. Copy from track #2.
y = B : Chord can be C-maj or C-maj 7. Keep note order. Copy from track #3.
y = B : Chord can be C-maj or C-maj 7. Keep note order. Copy from track #4.
Do you remember that there are two buttons in screen 5, where you can either tell that you have a percussion sample or a major chord sample? You don't want percussion samples such as drums to change from e.g. C-3 to A-2. VividTracker will ignore those samples and just copy them as is if you have marked them as a percussion sample. This allows you to have both drums and instruments in the same track, and still be able to transpose the instruments but not the drums.
It is very common in tracker music to sample instruments that play e.g. a C-maj chord as one sample and a C-min chord as another sample. We would of course like to get these instruments transposed correctly depending on their sample. If you set a sample to be a major chord, VividTracker will assume that the next sample will be a minor chord. Example: If sample #8 is a major chord and you have set the MAJ CHORD SMPL button, VividTracker will replace that sample with sample #9 if you are transposing your track from C-major to A-minor.
You can combine the two, i.e. tell VividTracker that a sample is both a major chord and a percussion. This is perhaps a bit strange, but it means you can actually let VividTracker replace e.g. a drum with another drum as you go from a major chord to a minor chord.
The Auto Chord feature is versatile, and therefore complicated to understand. At times, it's of course nice to see what is actually being played. You can do that by pressing the PLAYED button on screen 6. This will then show you what is actually being played. Please note that if you are still in edit mode, you will still be able to edit the track with the Auto Chord data (although you won't be able to see it). If you save your module in MOD-format, this is the notes that will be stored. If you save your module in VTM-format, you will retain the effect 8 command.
This YouTube tutorial will show you how to AudioCopy a sample and then create a pattern using Auto Chord.
AutoChord Instruments
Now it is easier than ever to use the AutoChord feature. This is how it works: Press the + button to increase sample number on screen 1 till you get above 1F. You now have access to eight AutoChord Instruments. Instruments 1-4 corresponds to track 1-4 in pattern 0, and instruments 5-8 corresponds to track 1-4 in pattern 1 (e.g. instrument 6 is thus track 2, pattern 1). For each instrument, you can select if you want inversion 0, 1, 2 (or 3 for 7-chord) and if you want it transposed to major, minor, major7, or minor7.
When you get above sample 1F, you will see that the title of the SAMPL button changes to ACI (AutoChord Instrument) and that the intrument selected is 1:0M. The first number before the colon means it is ACI instrument 1. The second number, after the colon, means it is inversion 0 (no inversion at all). M means it is transposing to a Major. If you press the + button a few times, you will notice that the M will change to an m, meaning you are now transposing to a minor chord. Press the + button a few times more and you will see that it is changing to M7 and later m7. This means in whole, you have 14 different ways to transpose a track!
Bluetooth Keyboard Support
- Arrow keys: You can press an arrow key and hold it down, and the cursor will continue to move.
- Edit notes, sample number and effects with the keyboard
- Press § or <CTRL>-1 to decrease the keyboard one octave
- Press ESC or <CTRL>-2 to increase the keyboard one octave
- Press <CTRL>-6 to <CTRL>-0 to jump to positions 0, 16, 32, 48, 63 (just like in Protracker where you use F6-F10)
- Press <ALT>-6 to <ALT>-0 to jump to positions 0, 16, 32, 48, 63 and play the pattern from this location.
- Press <SHIFT>-6 to <SHIFT>-0 to reprogram the positions
- Cut, copy, paste track by pressing SHIFT+3, SHIFT+4, SHIFT+5
- Cut, copy, paste pattern by pressing ALT+3, ALT+4, ALT+5
- Block mark, cut, copy, paste by pressing <CTRL>-B (or M) for block mark, <CTRL>-X for cut, <CTRL>-C for copy, and <CTRL>-F or <CTRL>-V for paste
- Insert row (and push down the other rows) in track by pressing <SHIFT>-ENTER
- Delete row (and move up the other rows) in track by pressing <SHIFT>-BACKSPACE
- Clear note in track by pressing BACKSPACE
- SPACE plays pattern, <CTRL>-SPACE plays song, <ALT>-SPACE toggles EDIT
- <SHIFT>+ARROW LEFT/RIGHT decreases/increases song position
- <CTRL>+ARROW LEFT/RIGHT decreases/increases sample
- <ALT>+ARROW LEFT/RIGHT decreases/increases pattern number
- <ALT>+ARROW UP/DOWN deletes or inserts pattern at the current position
- <ALT>+z/x/c/v mutes/unmutes channels 1/2/3/4
- <ALT>+q unmutes all channels
- <CTRL>+s decreases steps
- <ALT>+s increases steps
- RETURN has the same functionality as the STEP button
High notekeys:   2 3   5 6 7   9 0   =
                q w e r t y u i o p [ ]

Low notekeys:     s d   g h j   l ;
                 z x c v b n m , . /
If you have selected a scale other than chromatic, the keyboard will behave a little bit differently:
Octave 3: q w e r t y u i
Octave 2: a s d f g h j k
Octave 1: z x c v b n m ,
The note being played will depend on which scale and key you have selected. Say you have selected E-Minor Pentatonic as scale and key. Then, the first key on ea ch octave will correspond to the lowest note that can be played on that octave f or that key and scale, which in this example will be z=D-1, a=D-2, q=D-3. Each row will correspond to a given octave, but may continue into the next octave.
Note that only lowercase keys will work. Don't use uppercase, e.g. QWERTY. Also, only American or English keyboards will work properly so you have to change the keyboard language to any of them. Since iOS supports multiple keyboards, you can easily swap keyboard before you start VividTracker. This is easily done by holding down the command and space buttons on your keyboard. You will then get up a menu where you can shift between the two languages. To swap, you have to keep holding the command button while you release and press the space button again. Note that it has to be done somewhere where you can type, e.g. the Notes app. You can actually do it within the VividTracker app too, by bringing up the textfield to change the mod name.

